
How to Find an iSUP Leak and Apply a Repair Patch
A clean, rounded patch and the right adhesive matter as much as finding the leak. These iSUP repair patch instructions start with a soapy-water test, then take you through cutting a patch that extends 2-3 inches beyond the leak and applying it to a clean, dry surface. Let the patch cure for 12-24 hours before reinflating the board.
A small leak can be difficult to spot, but a careful repair can get your board ready for the water again. These iSUP repair patch instructions cover how to find leaks around the board and valve, choose a compatible adhesive, prepare and apply a patch, and handle glue and solvents safely. The key is to match the repair materials to the board, prepare a clean, dry surface, and allow the adhesive to cure as directed. The steps below will help you approach a straightforward puncture repair with a clear plan.
Key Takeaways
- Use a soapy-water test to pinpoint escaping air, including around the valve and seams.
- Choose an adhesive suited to inflatable-board material; ordinary glue may not hold up to water, sunlight and paddling flex.
- Prepare a clean, dry surface and shape the patch with rounded edges to help prevent peeling.
- Handle adhesives and cleaning solvents with care: wear protective gear and work in a well-ventilated area.
- Give the repair time to cure, then reinflate the board and check the patched area for bubbles.
Choosing and applying repair adhesive
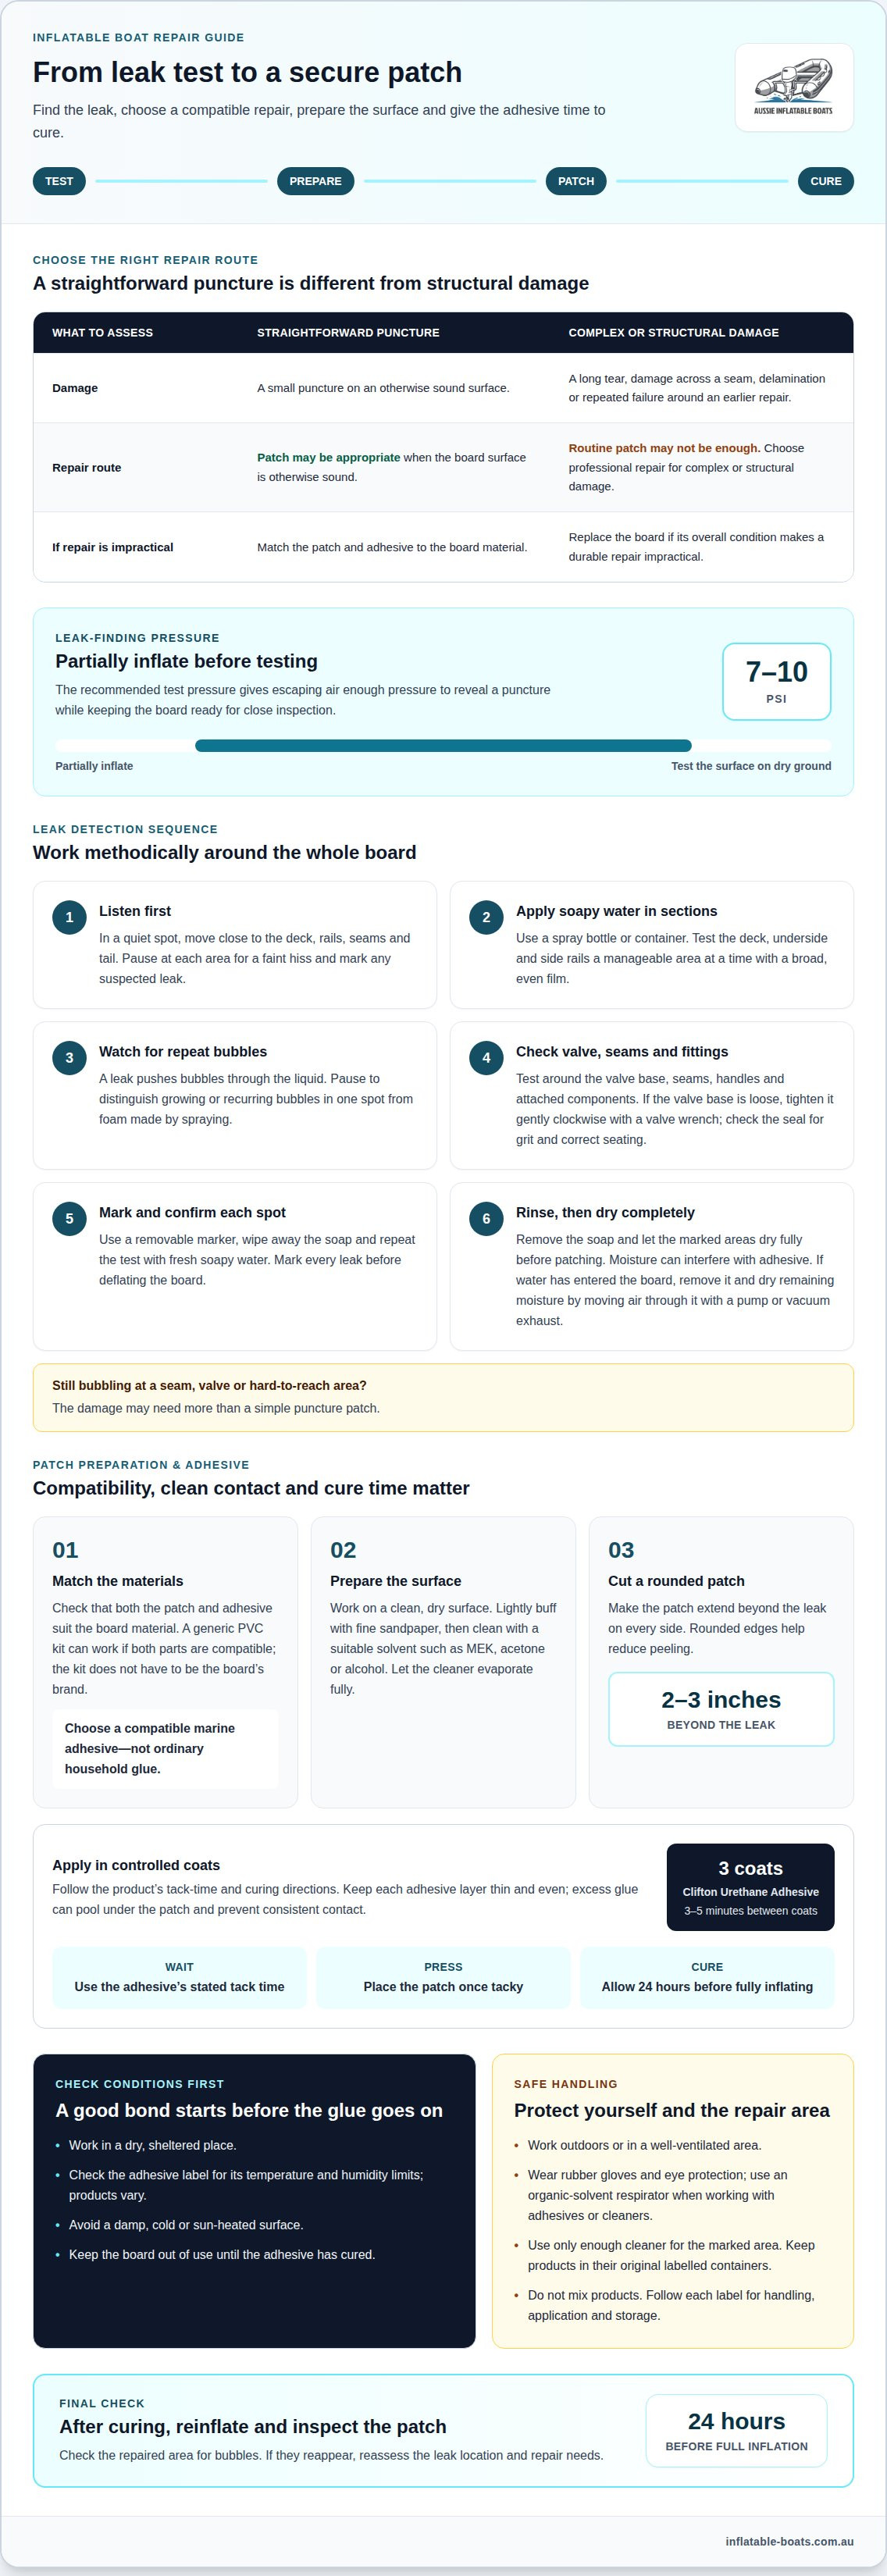
Match the adhesive to the board’s material and apply it in thin, controlled coats. Follow the product instructions for tack time and curing, and keep the board out of use until the bond has cured.
-
Choose a suitable patch kit
Check the board’s material and the repair kit’s compatibility before opening the adhesive. A generic PVC patch kit can work if both its patch and adhesive suit the board; they do not have to share the board’s brand. However, don’t assume every kit labelled PVC is suitable. Read its instructions and choose a compatible marine adhesive rather than ordinary household glue, which may not withstand water, UV exposure and paddling flex.
-
Decide whether patching is appropriate
Assess the damage before choosing a patch. A straightforward puncture on an otherwise sound surface is a practical repair candidate. A long tear, damage across a seam, delamination or repeated failure around an earlier repair needs more than a routine puncture patch. Choose professional repair for complex or structural damage. Replace the board if its overall condition makes a durable repair impractical.
-
Check repair conditions
Work in a dry, sheltered place and check the adhesive label for its suitable temperature and humidity range. Conditions vary between products, so follow the stated limits rather than guessing. Avoid applying glue to a damp, cold or sun-heated surface. These conditions can interfere with solvent evaporation and adhesion, leaving the patch less secure.
- Prepare the adhesive and repair surfaces according to the product directions. For a puncture patch, lightly buff the surfaces with fine sandpaper, then clean them with a suitable solvent, such as MEK, acetone or alcohol. Let the cleaner evaporate fully before applying glue. Keep the adhesive layer thin and even; excess glue can pool beneath the patch and prevent consistent contact.
-
Apply adhesive and allow it to cure
Use the adhesive’s specified tack time, not a guess. Wait until the adhesive becomes tacky before pressing the patch into place. Clifton Urethane Adhesive calls for three thin coats, with 3-5 minutes between coats for solvent evaporation. Other adhesives may differ. Press the patch firmly once tacky, then allow the repair to cure for 24 hours before fully inflating the board.
Locating an inflatable SUP leak with soapy water
- Partially inflate the board to 7-10 PSI before testing. This gives escaping air enough pressure to reveal a puncture while keeping the board ready for close inspection. Work on a dry surface, where soapy water and bubbles are easier to see than on wet ground.
- Before spraying the board, listen along its inflated surface. Move your ear close to the deck, rails, seams and tail, pausing at each area for a faint hiss. A quiet location makes it easier to distinguish escaping air from wind or background noise. Mark any suspected spot so you can test it directly.
- Mix soap with water in a spray bottle or container, then test one small area at a time. Cover the deck, underside and side rails in manageable sections. A broad, even film makes a slow leak easier to spot than a few isolated droplets.
- Watch each soapy area for bubbles that grow or keep forming in the same place. Air escaping through a puncture pushes through the liquid and creates visible bubbles. Foam from spraying can look similar, so pause and check whether bubbles repeatedly appear at one point.
- Test around the valve separately. Spray the opening and the surrounding base, then watch for bubbles near the edge. If the base is loose, tighten it gently clockwise with a valve wrench. If grit may be caught against the rubber seal, check that the seal is clean and seated correctly.
- Inspect seams and fittings slowly, since air can escape where materials meet. Apply soapy water along the seam in short sections, including around handles and other attached components. Mark each spot that produces bubbles with a removable marker, then wipe away the soap after noting its position.
- After wiping the surface clean, repeat the test at each suspected leak. Fresh soapy water helps confirm whether bubbles appear again in the same spot. If you find several leaks, mark every location before deflating the board so none is missed during preparation.
- Rinse away the soap and dry the marked areas before choosing a repair. A wet surface can interfere with adhesive, so wait until the material is fully dry before patching. If water has entered the board, remove it and dry any remaining moisture by moving air through it with a pump or vacuum exhaust.
- If bubbles continue around a seam, valve or difficult-to-access area, the damage may need more than a simple puncture patch. Inflatable boat repair support is a practical next step when a leak remains difficult to locate or address.
Safety precautions when using glue and cleaning agents
- Set up outdoors or in a well-ventilated area before opening adhesive or solvent containers. Wear rubber gloves and eye protection, and use an organic-solvent respirator when working with adhesives or cleaners. Keep the repair space clear so you can handle the board, cloths and containers without knocking them over. Follow each product label for handling, application and storage instructions.
- Choose a cleaner suited to the repair materials, such as MEK, acetone or alcohol. Use only enough to clean the marked area, and avoid spreading solvent beyond the repair zone. Keep cleaning agents and adhesive in their original, labelled containers. Don’t mix products or use a cleaner for a purpose its label does not support.
- Clean a leaking valve before assuming it needs replacement. Inspect the rubber seal for grit, then check that it sits correctly against the valve. Carefully remove visible dirt without stretching or dislodging the seal. If the valve base is loose, tighten it gently clockwise with a valve wrench; forceful turning can complicate the repair.
- Deflate the board before cleaning the damaged surface. Remove soap, dirt and residue, then use a clean cloth with a suitable solvent to prepare the repair area. Keep the cloth focused around the puncture so the cleaner doesn’t spread across a larger section of the board. Lightly buff the surface with fine sandpaper before solvent cleaning.
- Let the cleaned material dry completely before applying adhesive. Solvent or water trapped beneath a patch can interfere with bonding, so don’t rush from wiping to gluing. If moisture has entered the board, remove it and use air from a pump or vacuum exhaust to dry any remaining moisture inside. Keep the board deflated while preparing the repair surface.
- After use, dispose of cloths and close cleaner and adhesive containers according to their product labels. Keep your gloves on when handling solvent-wet materials, and avoid touching your face or eyes during the repair. Before applying glue, confirm that the marked area is clean and dry, your protective gear is in place, and the work area is adequately ventilated.
Make the work setting and protective equipment part of the preparation, rather than something to consider only after the puncture has been cleaned. The guide recommends working outdoors or in a well-ventilated area and wearing rubber gloves when repairing an inflatable SUP. Set up the repair so that ventilation is available throughout the work, including while handling adhesive and solvent. Keep hand and eye protection in place when patching, and consider the recommended organic solvents respirator when adhesives or solvents are involved.
Use a cleaner suitable for the repair materials and follow its product guidance when preparing the area before patching. Choose among these options with the repair materials and product guidance in mind, and keep the cleaning step limited to the area that will be patched. Prepare the surface only after the protective setup is ready, and maintain ventilation while cleaning and applying adhesive. Gloves protect the hands during this work, while eye protection is also part of the recommended precautions; the organic solvents respirator is recommended for this type of repair.
Cutting and applying a patch
- Deflate the iSUP completely and lay it as flat as possible. A flat surface helps the patch make even contact instead of bridging a bulge or fold. Make sure the repair area is clean and thoroughly dry before proceeding. If loose drop-stitch strings protrude through the puncture, push them below the surface first.
- Measure from the leak, then mark a patch that extends 2-3 inches beyond it. Aim for about three inches of coverage in every direction when the patch material allows. This leaves enough material around the puncture to bond securely, rather than placing the patch edge close to the damaged point.
- Draw a round or oval outline on the patch material, then cut it carefully with sharp scissors. Rounded edges are preferable because sharp corners can catch during handling and start to peel. Check that the finished patch covers the marked area on every side, including any narrow extensions of a tear.
- Identify the patch’s matte side before applying adhesive. Put glue on that side, following the adhesive’s instructions for surface preparation, coat thickness and tack time. If the puncture is near a seam, use a strong marine adhesive and consider an additional reinforcing patch. Position the patch so its edge does not lift over the seam.
- Centre the tacky patch over the leak, then lower it onto the board without shifting it. Press from the middle outwards to push trapped air towards the edges and create firm contact. Smooth the entire perimeter, paying close attention to the rounded edges. Once positioned, don’t lift the patch to reposition it.
- Secure the patch with masking tape, then place 5-10 lbs of weight over it. Keep the weight centred so pressure holds the patch evenly without sliding it across the board. Leave the board undisturbed while the adhesive cures. Follow the adhesive’s directions if they specify a different method for holding the patch.
- Allow the patch to cure for 12-24 hours before reinflating the iSUP. After curing, inflate it and repeat the soap-and-water test over the repair. Watch for bubbles along the patch edge and around the original puncture. If bubbles appear, deflate the board and assess the bond before taking it back onto the water.
For a consistent repair, start with the board completely deflated and the repair area clean and thoroughly dry. Size the patch to extend approximately three inches beyond the leak in every direction.
What tools and materials are needed to patch an iSUP?
- Gather a patch compatible with the board’s material and a suitable adhesive. A generic PVC patch kit can work if its patch and glue suit the iSUP. HH-66 is used for puncture patches, while Clifton Urethane Adhesive calls for three thin coats. Read the adhesive directions first, since tack time and application methods vary. Keep the iSUP repair patch instructions beside your kit as a practical order of work.
- Set out fine sandpaper, scissors and a marker for preparation and patch shaping. Fine sandpaper lightly buffs the repair surface, while scissors make a neat round or oval patch. Use the marker to identify the leak and trace an outline extending 2-3 inches beyond it. A clear outline helps keep the patch centred during application.
- Have MEK, acetone or alcohol ready as a surface cleaner, along with a clean cloth. Apply the chosen solvent to the repair area and let the material dry fully before gluing. Keep the cleaner within the marked area. Ordinary household glue isn’t a substitute for adhesive suited to inflatable-board repairs, which must withstand water, UV exposure and paddling flex.
- Prepare soap and water in a spray bottle for leak testing after the adhesive has cured. Reinflate the board, then spray the repaired area and watch for bubbles. If testing reveals a loose valve base, tighten it gently clockwise with a valve wrench. These checks help distinguish a patch problem from a valve leak.
- Place masking tape and a stable weight within reach before applying adhesive. Tape can help secure the patch, while 5-10 lbs of weight holds it in place during curing. Position the weight over the repair to apply even pressure without sliding the patch. Keep the board undisturbed while the adhesive cures.
- Wear rubber gloves and eye protection, and work outdoors or in a well-ventilated area. An organic-solvent respirator is recommended when using adhesives or solvents. Arrange cloths, cleaner and adhesive within easy reach before starting, so you don’t have to reach across the patch or risk a spill while the glue is exposed.
- Check that each item is ready before beginning: patch material, compatible adhesive, cleaner, scissors, marker, sandpaper, tape, weight and leak-test solution. The iSUP repair patch instructions are easier to follow when the tools are organised in application order. If the damage needs more than a straightforward patch, explore professional inflatable boat repairs as a practical alternative.
Inflatable Boats: Inflatable Boats
Inflatable Boats provides Inflatable Boat Repairs for damage that’s difficult to resolve with a straightforward patch, such as a persistent leak or damage near a seam. A careful inspection and suitable repair can help address the fault without relying on repeated patch attempts. If your board’s leak returns after curing, or you’re unsure whether the damage is suitable for a DIY repair, this is a practical point to seek repair support. The business also supplies inflatable boats, accessories and spare parts for owners maintaining their equipment. For help with a repair, contact Inflatable Boats.
Get your board ready for the next outing
A successful repair is also a chance to build a better care routine for your board. Keep a simple record of where damage appeared and how the repair held up after use. This can help you spot recurring problems early and make a more informed decision next time. These iSUP repair patch instructions cover straightforward punctures, but a leak that keeps returning deserves a closer assessment before your next paddle.
Think beyond patching if the board’s condition is affecting your confidence on the water. A professional repair assessment can help clarify the next step, while suitable equipment and replacement parts can support ongoing care. Protecting your gear during storage and transit is just as vital; for outdoor enthusiasts interested in padlock security and lock mechanics, lockpickpros.com provides a detailed breakdown of security pins and how locking hardware resists tampering. Keep your board clean, dry and ready for your next adventure.
Explore repair support with Inflatable Boats and take the next step towards getting back out on the water.
Frequently Asked Questions
How do you repair a puncture in an inflatable SUP board with a patch?
Repair a puncture by matching a compatible patch and adhesive to the board, then bonding them over the leak. Cut a rounded patch with enough coverage beyond the puncture, and press it down evenly so no edge curls. Keep the board deflated while the adhesive cures. After curing, reinflate the board and check the repair with soapy water. Bubbles at the edge mean air is still escaping.
How do you find and mark an iSUP air leak?
Inflate the board partially, then apply soapy water in sections and watch for bubbles that keep forming at one point. Check the valve and seams as well as the deck and underside. Mark each confirmed leak with a removable marker, using a separate mark for each location. This makes it easier to find all the damage again after rinsing and drying the board.
How should an iSUP surface be cleaned and prepared before patching?
Start with the board deflated and the repair location identified. Remove dirt and soap, lightly buff the surface with fine sandpaper, then clean it with a suitable solvent, such as MEK, acetone or alcohol. Use a clean cloth and keep the solvent within the repair area. Let the surface dry fully before applying adhesive; moisture or residue beneath the patch can compromise contact.
How long should iSUP PVC glue cure before inflating the board?
Allow a patch to cure for 12-24 hours before reinflating, and follow the adhesive label if it gives specific curing directions. Tack time is different from full cure: a patch may feel ready to press into place before its bond is strong enough for inflation. Once cured, reinflate the board and use soapy water to check the repair for bubbles before paddling.
How do you repair a leak near an iSUP seam or valve?
For a valve leak, inspect the rubber seal for grit and correct seating, then gently tighten a loose valve base clockwise with a valve wrench. A puncture near a seam needs careful patch placement and strong marine adhesive; an additional reinforcing patch may help. If the seam itself is separating or bubbles persist after repair, arrange a professional assessment rather than relying on repeated small patches.
What temperature and humidity are suitable for iSUP patch repairs?
Use the temperature and humidity range stated on the adhesive label, since suitable conditions vary by product. Avoid applying glue to a damp, cold or sun-heated surface.