
ISUP for Sale: Packages, Features and Rider Weight
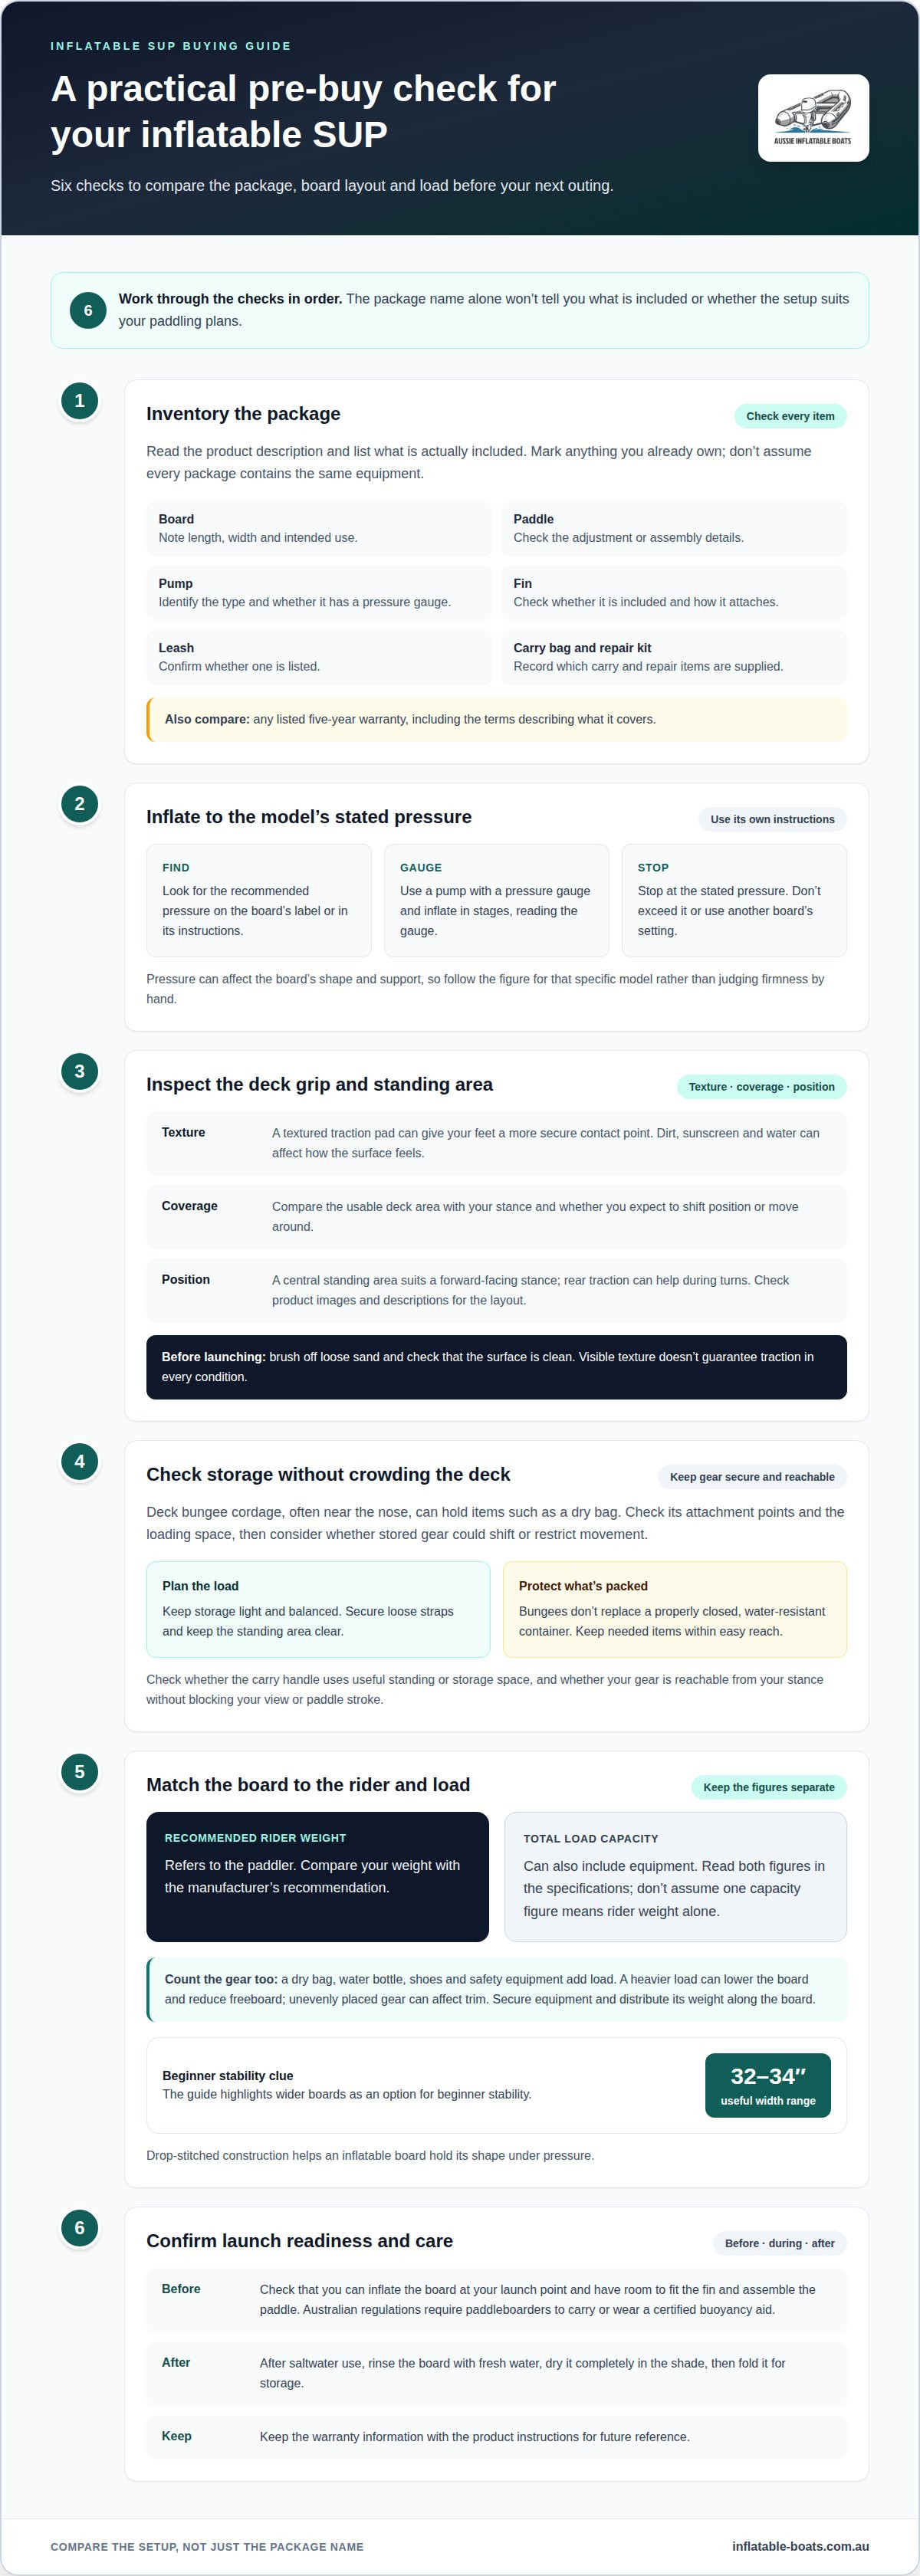
The biggest package isn’t automatically the best fit. When comparing an iSUP for sale, look beyond the board: check what the package includes, how the deck is laid out, and whether the recommended rider weight suits you and your gear. Drop-stitched construction is another important detail because it helps explain how an inflatable board holds its shape under pressure.
It’s easy to focus on appearance or the number of accessories in the box. A better choice is one that matches how and where you plan to paddle. This guide explains what to compare in inflatable SUP packages, which deck features matter on the water, what drop-stitched construction means, and how to interpret the recommended rider weight. You’ll have a clearer way to assess the board and its included equipment before choosing a setup for your next outing.
Key Takeaways
- Compare package contents item by item so you can spot what you’ll need for your intended paddling trips.
- Assess deck grip and storage features against how you plan to move and carry gear on the water.
- Use the recommended rider weight as a guide to how the board may perform with you and your equipment aboard.
- Understand how drop-stitched construction helps an inflatable board hold its form when inflated.
- For beginner stability, look at wider boards; the guide highlights 32-34 inches as a useful range.
Inflatable SUP packages for sale
A package can simplify your first launch, but included equipment varies. Compare each item with how you plan to paddle: a touring day calls for different gear from a short session close to shore. An iSUP for sale may include a board and accessories, but the package name alone doesn’t tell you what’s in the box.
Start with the product description. List every included item, then mark what you already own. Look for the board, paddle, pump, leash, fin, repair kit and carry bag. Use these as a checklist, not an assumption that every package includes them. If you plan to paddle with a companion, check whether the included paddle suits your setup. One missing essential can affect how ready the package is for your first outing.
Pay close attention to inflation pressure. Find the board’s recommended pressure on its label or in its instructions, then use a pump with a pressure gauge. Inflate in stages and read the gauge rather than judging firmness by hand. Stop at the stated pressure and don’t exceed it. Pressure can affect the board’s shape and support, so follow the figure for that specific model. Don’t use another board’s pressure setting, even if both are inflatable.
Before buying, compare package details side by side. A simple table helps:
- Board: note its length, width and intended use.
- Fin: check whether one is included and how it attaches.
- Pump: identify its type and whether it has a pressure gauge.
- Paddle: check what adjustment or assembly the instructions describe.
- Carry and repair items: record the bag and any repair materials included.
These details show practical differences without relying on package names. A listed five-year warranty is another point to compare, along with the terms explaining what it covers. Keep the warranty information with the product instructions for future reference.
Plan your launch as well. Check that you can inflate the board at your intended launch point, and allow room to fit the fin and assemble the paddle. Australian regulations require paddleboarders to carry or wear a certified buoyancy aid, so add one to your checklist before heading out. After saltwater use, rinse the board with fresh water, dry it completely in the shade, and then fold it for storage. This helps you assess the whole setup, not just what comes in the package.
Deck grip and storage features
Deck grip affects how securely you can stand while paddling. Before choosing a board, inspect the traction pad’s surface, coverage and position. A textured pad can give your feet a more secure contact point. Coverage matters too: a small pad leaves less room to shift your stance than a broad deck area. Compare the layout with your usual posture and paddling style.
Check where the pad sits. A central standing area suits a forward-facing stance, while rear traction can help during turns. Layouts vary between boards, so use product images and descriptions to assess each design. Check whether the pad covers the area where you’ll plant your feet. If you expect to change stance or move around, consider whether the usable deck space allows it.
Grip depends on more than the printed pattern. Dirt, sunscreen and water can affect how the deck feels underfoot. Before launching, brush off loose sand and check that the surface is clean. Don’t assume visible texture guarantees traction in every condition. Footwear, balance and water movement also influence stability. Stand with your feet comfortably apart, then adjust gradually as you paddle.
Storage features help keep loose gear organised. Many boards have bungee cordage across the deck, often near the nose. It can hold items such as a dry bag, but it doesn’t replace a properly closed, water-resistant container. Check the cord’s attachment points and the space beneath it. A bulky load can restrict movement or shift while you paddle.
Use this practical inspection before buying:
- Deck pad: assess its texture, coverage and position.
- Cordage: check the attachment points and available loading area.
- Carry handle: note whether it occupies useful standing or storage space.
- Gear access: consider whether you can reach stored items from your stance.
Keep storage light and balanced. A dry bag secured beneath the front bungees shouldn’t block your view or restrict your paddle stroke. Keep frequently needed items within easy reach and secure loose straps before launching. Consider your intended load when assessing the board’s layout: a setup that works for a short shoreline paddle may feel cramped on a longer outing.
For a broader view of inflatable watercraft options, compare the available range alongside your deck and storage needs. The best layout is the one that leaves your stance clear, keeps essential gear secure and lets you move without obstruction.
Recommended rider weight
A board’s recommended rider weight helps match its design to the person paddling. It differs from total load capacity. Rider weight refers to the paddler; total load can also include equipment. Read both figures in the manufacturer’s specifications. If a listing gives only one capacity figure, don’t assume it refers to rider weight alone.
Start with your own weight, then account for what you’ll carry. A dry bag, water bottle, shoes and safety equipment all add load. For example, if you’re carrying a packed bag, consider more than your body weight alone. Keep the board’s stated rider recommendation and total capacity separate in your notes. This distinction helps you avoid choosing a board based on the wrong figure.
Next, consider how the load affects the board on the water. A heavily loaded board sits lower, which can reduce freeboard and leave less room for movement. Unevenly placed gear can also affect trim, making the nose or tail sit lower. Secure equipment and distribute its weight along the board. Keep the standing area clear so your stance and paddle stroke aren’t restricted.
Use this comparison process for each model:
- Find the rider recommendation: use the manufacturer’s product details or board markings.
- Find total capacity: note whether the figure includes the paddler and carried equipment.
- Estimate your outing load: include clothing, water and bags you’ll bring.
- Compare the figures: make sure your planned setup fits both limits.
Consider the conditions you expect to paddle in, too. A calm-water outing with a small bag differs from a longer trip with extra gear. The board’s width, length and construction also affect how it feels under load. Weight guidance alone doesn’t describe the whole ride, so assess those design details alongside the stated recommendation.
Don’t treat the recommended rider weight as a target to exceed. A board may still float above that figure, but its handling and comfort can change. Likewise, a board’s maximum capacity doesn’t guarantee a suitable fit for every paddler. Read the manufacturer’s wording carefully, especially if several riders or bulky equipment will share the deck.
Before buying, write down your expected load and compare it with each board’s stated limits. For a shared setup, include your companion’s equipment in the load you consider. If the listing separates rider weight from total capacity, use each figure for its stated purpose. This gives you a clearer basis for choosing a board for your planned paddling, rather than relying on appearance alone.
How do iSUPs compare with hard stand-up paddle boards?
An inflatable SUP and a hard board solve different transport challenges. An iSUP deflates for storage and transport, while a hard board keeps its shape. That difference matters before you reach the water. A paddler with limited garage space may prefer an inflatable design. Someone with room to store and transport a rigid board may prefer that format.
Construction affects how each board behaves. An iSUP has an inflatable body, often made with drop-stitched material. Thousands of internal fibres connect its upper and lower surfaces, helping the inflated board hold its form. A hard board has a rigid shell around its core. Materials and construction vary by model, so compare the details instead of assuming every board performs alike.
On the water, stiffness influences how a board responds underfoot. A properly inflated iSUP supports the paddler through air pressure and its internal construction. A hard board’s solid form feels different and doesn’t require inflation as part of setup. For either type, follow the manufacturer’s instructions and intended use. Board shape, width and fin arrangement also affect tracking and turning.
Transport creates another clear distinction. An inflatable board can be deflated and packed into its carry bag after use. A hard board needs suitable space for transport and storage. Consider the route from home to the launch point, too. Carrying an inflated board along a short path differs from loading a rigid board onto a vehicle. Your storage space and transport method can guide your choice.
- Choose an iSUP if compact storage and pack-down matter.
- Choose a hard board if you have room for a rigid hull.
- Compare construction and intended use for each model.
- Plan transport from storage to your usual launch point.
Care routines differ as well. An iSUP needs to be inflated before use and deflated for packing. Follow its pressure instructions, then dry it before storage. A hard board doesn’t need inflation or folding, but its rigid surface still needs sensible handling. For example, plan where it will rest during transport to reduce knocks against hard edges.
Neither construction type suits every paddler or outing. Limited storage space can make an inflatable option practical, while a dedicated rack can accommodate a hard board. Compare the whole setup: construction, storage, transport, care and intended use. That gives you a more useful basis for choosing than appearance alone.
After paddling in saltwater, rinse the board with fresh water, then dry it completely in the shade before folding it for storage. Keep the order clear: rinse first, leave the board unfolded while it dries fully in the shade, and fold it only when it’s completely dry. Before packing it away, make one final check that no areas remain damp. Factor this rinse-and-dry routine into your comparison of care needs, alongside the handling and storage requirements of each construction type.
Stability for beginners
For a first board, width is a practical place to start. Wider SUP boards measuring 32-34 inches provide maximum stability for beginners. That width gives you a broader platform for finding balance. It doesn’t replace checking the full design. Length, outline and intended use also shape how the board feels underfoot. Compare those details alongside width before choosing a board.
A broad deck can feel steadier as you step aboard, but stance matters too. Start with your feet about shoulder-width apart, knees slightly bent and eyes looking ahead. Staring down at your feet, for example, can make balancing harder. Keep the paddle blade in the water during your first strokes. It provides another point of support as you find a smooth rhythm.
Water conditions affect the learning experience. Choose a sheltered launch with minimal movement, then practise standing and kneeling before paddling farther. Even a small ripple can feel more noticeable than calm water, especially while you’re learning to shift your weight. Keep your first practice close to shore. Avoid crowded launch points, where other craft can distract you from maintaining balance.
Use this quick comparison when assessing beginner-friendly boards:
- Width: compare the board with the 32-34-inch stability range.
- Deck space: check that your stance fits without crowding stored gear.
- Shape: consider whether the outline suits your intended paddling.
- Fin setup: review the manufacturer’s description of tracking and handling.
Inflation also affects how an inflatable board supports you. Follow the pressure stated for that model; a board inflated below its recommendation may feel less firm. Check the gauge during setup, then inspect the board before launching. Don’t use a pressure setting from another model. This simple preparation helps the board maintain its intended shape beneath your feet.
Load placement can affect balance. Keep a dry bag secured and centred rather than piling it at one end. Gear shifted towards the nose can change how the board sits in the water. Match the board’s rider recommendation and total capacity to the paddler and equipment. A wide deck won’t make up for an unsuitable load or poor weight distribution.
Practise controlled movements before trying turns. Make short strokes on each side, then pause with the paddle across the deck. For a beginner, steady repetition builds confidence more effectively than rushing into faster water. Explore inflatable watercraft options and compare board designs with your preferred launch conditions and learning needs.
Inflatable Boats: Inflatable Boats
Inflatable Boats is a useful next step if your time on the water also calls for an inflatable watercraft, accessories or spare parts. Once you’ve compared SUP width, rider weight and deck layout, consider what else your outings require. Inflatable Boat Accessories can support your setup, while Inflatable Boat Spare parts are relevant when an existing inflatable boat needs a replacement component. For damage or maintenance needs, Inflatable Boat Repairs address inflatable vessels, rather than replacing the board-selection checks covered above. Match the next step to the equipment you own and the task at hand. To discuss inflatable boats, accessories, spare parts or repairs, contact Inflatable Boats.
Choose a board for the outings ahead
Before choosing an iSUP for sale, picture a real day on the water. Where will you launch? What will you bring, and how will you get the board home afterwards? A clear plan turns product details into practical priorities, helping you choose equipment that fits your routine rather than an imagined ideal trip.
Think beyond your first paddle, too. Your interests may shift from sheltered water to longer explorations, so choose a setup suited to how you want to spend time outdoors. Keep your intended use at the centre of the decision, then compare the options that support it. The right choice is one that makes getting out on the water feel achievable and enjoyable.
Ready to take your next step? Explore Inflatable Boats online and continue planning your time on the water. A thoughtful choice today can set the course for plenty of rewarding paddles ahead.
Frequently Asked Questions
What iSUP size and weight capacity suit different paddlers?
Choose a board using the manufacturer’s size and capacity guidance, your body size and your intended use. A lighter paddler carrying little gear has different needs from a larger paddler bringing a packed bag. Compare the board’s rider recommendation with its total load limit, and consider how its dimensions suit your experience and usual water conditions. Capacity alone doesn’t prove that a board will feel comfortable.
What accessories are included with iSUP packages sold in Australia?
Package contents vary, so check the individual Australian product listing rather than relying on the word “package”. Look for an itemised description and note which accessories are supplied, including their quantities where shown. Compare that list with what you already own and what your outings require. This inventory helps identify gaps before purchase and makes it easier to compare packages, even when two listings use similar descriptions.
What is the price range for inflatable stand-up paddle boards in Australia?
What are the risks of buying a cheap iSUP, and how can I check its quality?
Compare package contents item by item, check the board’s construction and deck features, and follow its specific pressure instructions. Also compare the manufacturer’s recommended rider weight and total capacity with your planned load.
What warranty, delivery and returns should I expect when buying an iSUP in Australia?
The listed inflatable SUP packages have a 5-year warranty; compare the warranty terms to see what it covers. The material provides no delivery or returns details.