
How to Patch an Inflatable SUP: A Practical Repair Guide
What if the leak you’re about to cover with a patch isn’t a puncture at all? A loose valve or separating seam can mimic a simple hole, and the wrong adhesive can turn a quick fix into a failed repair. If you’re wondering how to patch an inflatable SUP, start by identifying the damage, not reaching for the glue.
It’s tempting to treat every leak the same way, but the right repair depends on where the air is escaping and what the board is made from. A small, localised puncture may suit a DIY fix; seam or valve damage needs closer assessment. The patch material and adhesive must be compatible, and preparation and curing instructions vary by product. Rushing these steps can compromise the bond.
This guide explains how to locate and assess a leak, decide whether it’s suitable for DIY repair, and follow a careful patching process using the board maker’s guidance and the adhesive instructions. You’ll also learn when professional inflatable watercraft repair is a sensible alternative and how to check the repair cautiously before returning to the water. A reliable fix starts on shore, with patience and the right materials.
Key Takeaways
- Identify where the air is escaping before deciding whether a patch is the right fix.
- For how to patch an inflatable SUP, let the board maker’s material guidance determine which patch and adhesive are suitable.
- Follow the repair product’s instructions for preparing and applying the patch, then allow it to cure as directed.
- Check the repair cautiously after curing, using the board maker’s guidance before taking the SUP back on the water.
- Choose professional assessment for seam separation, valve problems, larger tears or damage you can’t confidently identify.
How to patch an inflatable SUP: first assess the damage
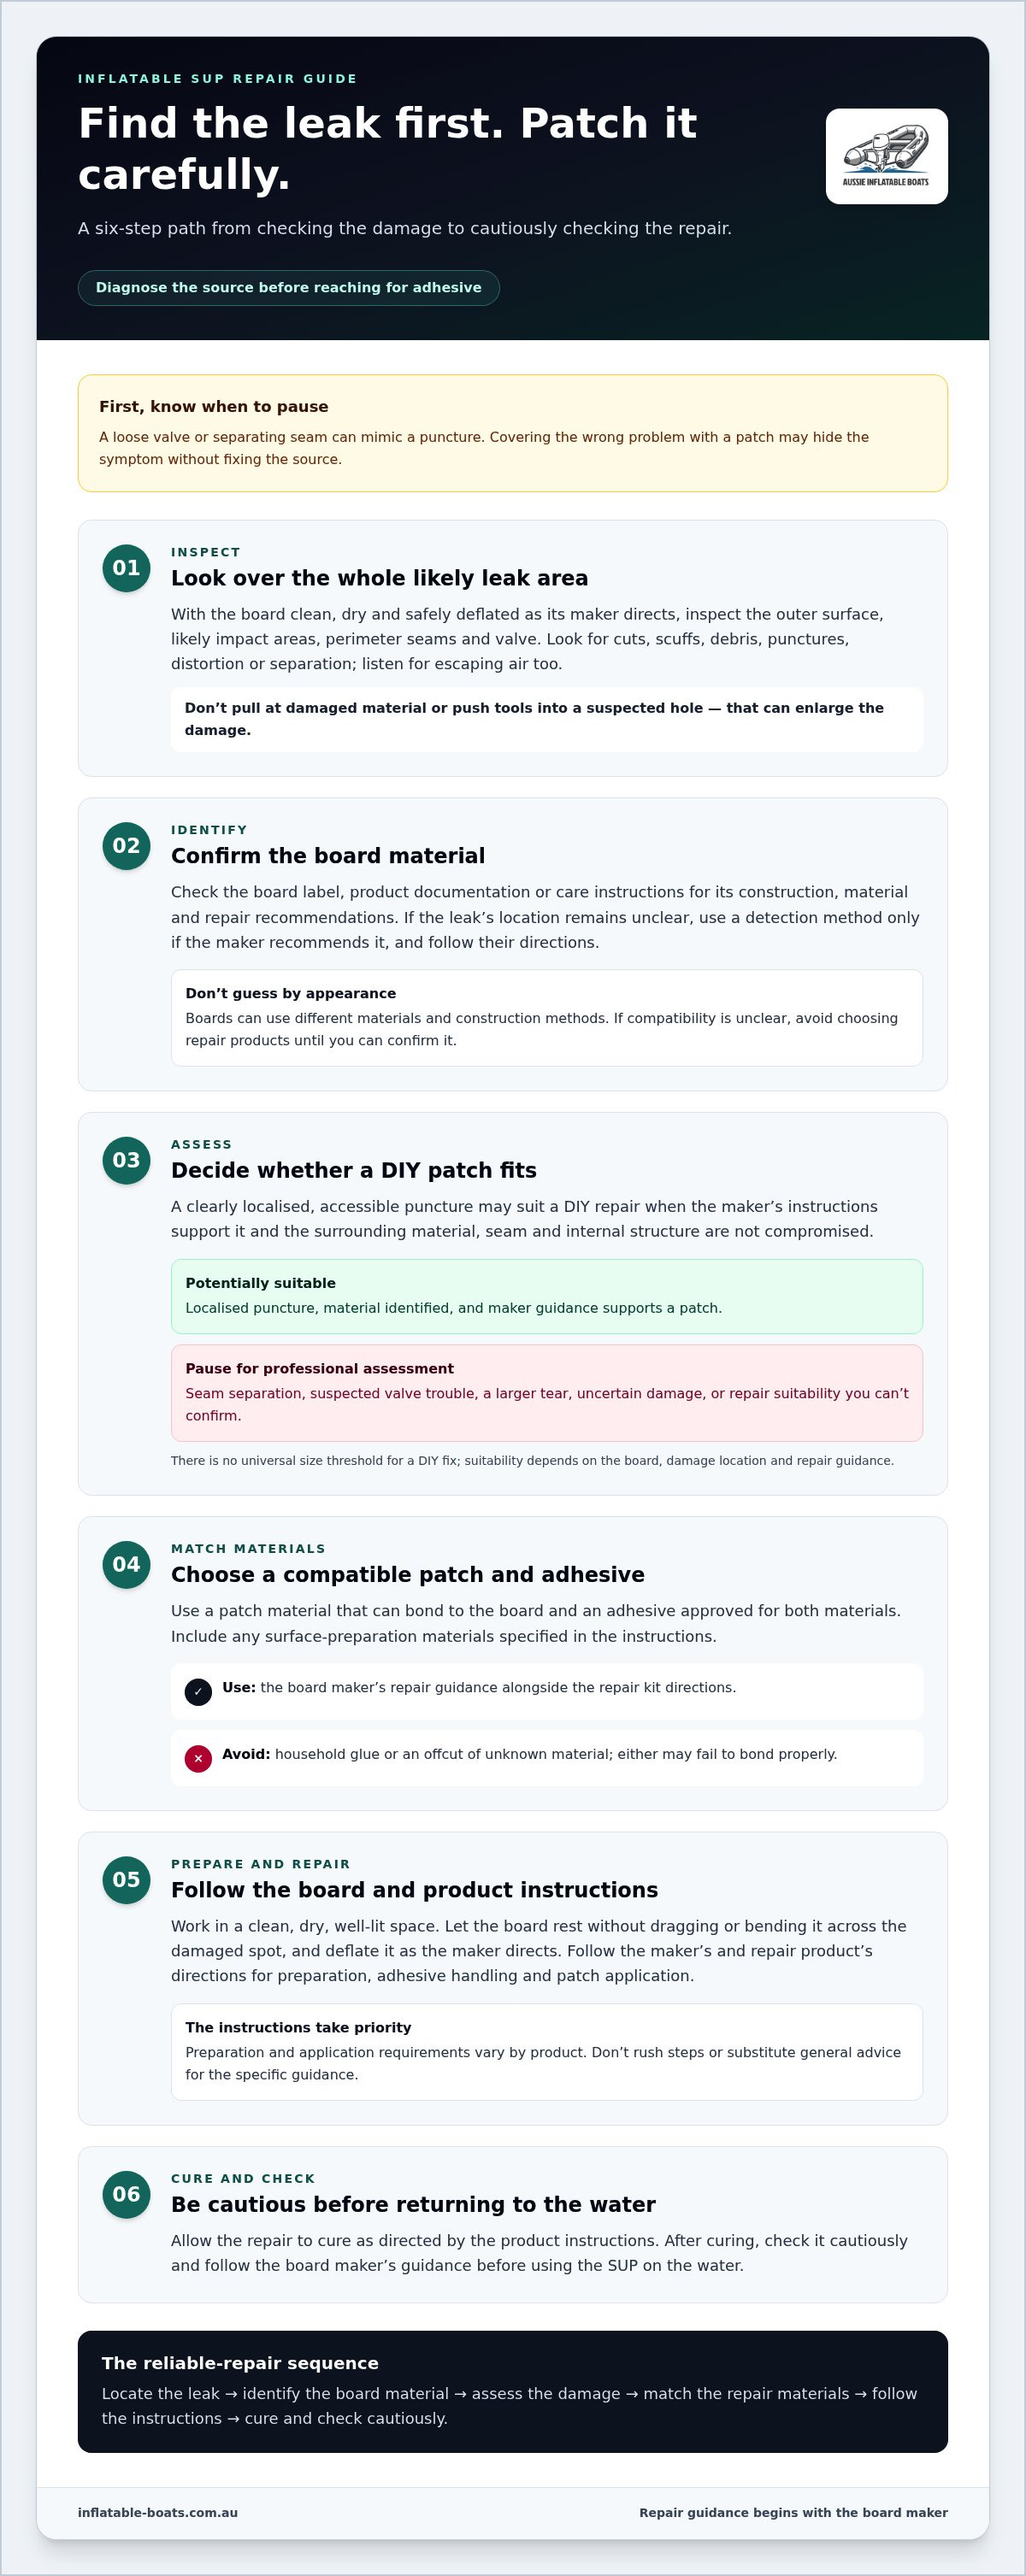
Not every leak calls for the same repair. A small puncture in an accessible area is different from a valve leak or a seam that’s beginning to separate. Take a calm, methodical look before choosing a fix. A patch applied to the wrong problem may hide the symptom without addressing the source.
Start with the board clean, dry and safely deflated as directed by its maker. Work in a clear, well-lit space and inspect the outer surface for cuts, scuffs, embedded debris or a visible puncture. Check the seams and valve area too, looking for separation, distortion or signs that air is escaping. Don’t pull at damaged material or push tools into a suspected hole. That can enlarge the damage and make it harder to assess.
How do you find a leak in an inflatable SUP?
Inspect likely impact areas, the perimeter seams and around the valve. Listen for escaping air and look for a visible mark, but don’t assume the first suspicious spot is the only source. If the location remains unclear, use a leak-detection method only if the board maker recommends it, following their directions carefully. Avoid improvised liquids or methods that could affect the board’s surface or construction.
Boards can differ in construction and materials, so general information about Standup paddleboarding is useful context, not a substitute for the manufacturer’s repair guidance. Use the maker’s instructions to identify the board material and choose a suitable inspection method.
Which SUP damage can you patch yourself?
An isolated, accessible puncture may be suitable for a DIY patch if the board maker’s instructions support that repair and you can identify compatible materials. The damage should be clearly localised, with no sign that the surrounding fabric, seam or internal structure is compromised.
A simple patch may be appropriate for a clearly identified, localised puncture when the maker’s repair instructions support it. Pause if you see seam separation, suspect a valve problem, find a larger tear or can’t identify the source of the leak. These faults may need a different repair process, and covering them with a patch can leave the board unreliable. There’s no universal size threshold for a DIY fix; suitability depends on the board’s construction, the damage’s location and the repair guidance. If the damage is uncertain, professional assessment is the safer next step.
Choose a patch and adhesive compatible with your inflatable SUP
A patch is only as dependable as the bond between its material, adhesive and board surface. Before choosing a repair kit, identify the board’s construction and follow its maker’s repair guidance. Similar-looking inflatable SUPs can use different materials or construction methods, so don’t assume that a patch or adhesive suitable for one board will work on another.
How can you identify the material of an inflatable SUP?
Check the board label, product documentation or care instructions for its material and repair recommendations. If the information isn’t clear, avoid guessing based on appearance. The board maker’s guidance should determine whether a patch repair is suitable and which products can be used on that surface.
What should a compatible SUP repair kit include?
A suitable kit generally needs a patch material that can bond to the board, an adhesive approved for both materials, and any surface-preparation materials specified in the instructions. Follow the kit directions as well as the board maker’s guidance, especially for cleaning and adhesive application. For a board confirmed to be made from PVC fabric, the Polymarine guide to PVC adhesive repair offers material-specific context. Don’t apply its advice to a board made from another material without first confirming compatibility.
Improvised materials may seem convenient, but a patch that doesn’t match the board or an adhesive not designed for its surface may fail to bond properly. Don’t substitute household glue or an offcut of unknown material for a repair system supported by the maker.
| Damage or board condition | Suitable next step | When to seek advice |
|---|---|---|
| Localised puncture; material identified | Use a compatible patch and adhesive if the maker’s instructions support DIY repair. | If the surface is damaged beyond the puncture or repair suitability is unclear. |
| Material or construction unknown | Check the label, product documentation or care instructions before selecting repair products. | If you can’t establish compatibility. |
| Seam, valve or larger tear affected | Pause rather than covering it with a basic patch. | Seek professional assessment before attempting a repair. |
Choosing how to patch an inflatable SUP starts with matching the repair to the board, not simply picking the most convenient kit. Once you’ve identified the material, explore inflatable SUPs and accessories for relevant gear and parts.
How to patch an inflatable SUP: prepare and apply the repair
Once you’ve confirmed that the damage is suitable for a DIY patch and selected compatible materials, work in a steady sequence. The board maker’s instructions and the repair product’s directions take priority over general advice. They determine how to deflate and prepare the board, handle the adhesive and apply the patch.
How should you prepare an inflatable SUP before patching?
Choose a clean, dry work area where the board can rest without being dragged or bent across the damaged spot. Deflate it as the maker directs, then prepare the repair area using only the cleaning and surface-preparation method specified for the board and repair product. Moisture, dust or residue can interfere with the bond. Don’t cut, sand or abrade the surface unless the instructions specifically call for it.
A clean, fully dry surface gives the compatible adhesive and patch the conditions they need to form a dependable bond.
Before opening or applying adhesive, read the full product directions. Check any safety and handling instructions, including guidance for ventilation and keeping the product away from sources of ignition, if specified. Don’t improvise with solvents, cleaners or tools; a method that suits one material may harm another.
How do you apply and secure the patch?
First, place the compatible patch over the repair area without adhesive to check its position and orientation. Make sure it covers the damage as the maker’s instructions require. When you’re ready, follow the repair product’s directions for applying adhesive, including which surfaces to coat and any specified preparation steps. These details differ between products, so don’t rely on a one-size-fits-all method.
- Prepare: Confirm the board is deflated as directed, and the repair area and patch are clean and dry.
- Position: Check the patch’s placement before applying adhesive, so you can lay it accurately when ready.
- Apply: Use the adhesive only as its instructions specify. Observe any stated application or handling requirements.
- Secure: Set the patch in place and press it firmly as directed. If the instructions recommend smoothing out trapped air, follow their method and use only any specified tool.
- Leave undisturbed: Follow the product’s curing directions before handling, inflating or testing the board.
Careful preparation matters more than speed. If the patch shifts, the adhesive behaves unexpectedly or the damaged area looks worse once prepared, stop rather than adding extra glue or forcing the repair. Recheck the instructions, and use professional repair if the damage no longer appears suitable for a DIY fix. That’s the practical answer to how to patch an inflatable SUP: use a compatible system, follow its process closely and don’t guess at the steps.
After patching an inflatable SUP: curing, checks and common mistakes
Let the repair product’s stated curing instructions set the timetable. Don’t inflate, load or paddle the board before the patch is ready, even if it looks firmly attached. Adhesives differ, so a general waiting period can’t replace the directions for the product used.
How do you check whether an SUP patch is holding?
Once the stated cure is complete, inspect the patch before testing the board. Look around its edges for lifting, visible gaps or signs that the material has shifted. Then follow the board maker’s guidance for cautious inflation and leak checking. Don’t exceed the maker’s directions or use a test method that hasn’t been recommended for the board.
A patch that looks secure isn’t proof that the repair is ready for the water. The repair must be fully cured and pass the appropriate check. If you see a lifted edge, detect renewed leakage or notice further damage, stop. Don’t paddle the board or try to conceal the problem with more adhesive; have the damage assessed before returning to the water.
What patching mistakes can lead to repair failure?
Small shortcuts can undermine the bond. A damp or dirty surface may prevent the patch from adhering properly, while an adhesive or patch material that isn’t compatible with the board can result in a failed repair. Follow the board maker’s and repair product’s instructions for materials and preparation.
- Rushing the cure: Handling or inflating the board before the product’s stated cure is complete can compromise the repair.
- Applying pressure incorrectly: Press and secure the patch only as directed by the repair product. Too little or unsuitable pressure may leave poor contact; don’t improvise a method.
- Checking only the patch: Nearby damage or another leak may remain. Inspect the surrounding area and follow the maker’s recommended leak-check procedure.
- Using one technique for every board: Materials and construction vary, so a method suitable for one SUP may not suit another.
Take your time with the check. If the patch moves, leaks or reveals damage you didn’t identify earlier, avoid taking chances on the water. For a repair that needs expert attention, explore professional inflatable watercraft repairs.
When to choose professional inflatable SUP repair instead
A DIY patch isn’t the right answer for every fault. If damage affects a seam or valve, involves a larger tear, or leaves you unsure about the board’s construction, pause rather than trying to seal it with a basic patch. These areas may need a repair approach beyond a straightforward surface fix.
When should you stop a DIY SUP repair?
Stop if you can’t confidently identify the damage, if it reaches a seam or valve, or if you find signs of damage beneath or around the outer surface. A patch that shifts or won’t hold, or a leak that returns after a repair, also calls for further assessment. Repeatedly adding adhesive or patches can obscure the fault without fixing its cause.
Professional inflatable watercraft repair is a practical option when the damage is complex or the right repair method isn’t clear. Inflatable Boats provides repair and restoration services for inflatable boats, including technical support for punctures, valve issues and structural components.
If you need help with a damaged board, explore the inflatable watercraft repair service.
What should you do before taking the board back on the water?
Follow the repair product’s curing instructions and the board maker’s guidance for returning the SUP to use. Once the repair is ready to check, inspect the patch and follow the maker’s recommended leak-check method. Don’t paddle if you notice lifted edges, a renewed leak, shifting material or signs of further damage. Arrange further assessment instead.
Knowing how to patch an inflatable SUP includes recognising when to stop. A cautious decision on shore is better than discovering the repair has failed on the water. For inflatable watercraft and repair support, explore inflatable watercraft and repair support.
Make your next repair decision with confidence
A dependable repair starts with correctly identifying the fault and matching the patch and adhesive to the board. For how to patch an inflatable SUP, patience matters: follow the maker’s and repair product’s instructions, allow the repair to cure as directed, then check it cautiously before heading back onto the water.
DIY patching may suit a localised puncture, but seam separation, valve trouble, larger tears or damage you can’t confidently assess are reasons to pause. Professional assessment can be a practical next step when the repair is more complex. Inflatable Boats offers professional repair services for inflatable watercraft, along with inflatable SUPs, accessories and spare parts.
Explore inflatable watercraft and repair support for repair services, inflatable SUPs, accessories and spare parts.
Frequently Asked Questions
Can you patch an inflatable SUP yourself?
Yes, a simple, accessible puncture may be suitable for DIY repair if the board maker’s and repair product’s instructions support it. For how to patch an inflatable SUP, start by confirming material compatibility, then prepare a clean, dry surface and follow the adhesive’s application and curing directions. Don’t assume every leak is a patching job. Stop and arrange professional assessment for seam or valve damage, a larger tear, or damage you can’t confidently identify.
What glue should you use to patch an inflatable SUP?
Choose an adhesive that’s compatible with both the board material and the patch system. Check the board maker’s repair guidance and the repair product’s instructions rather than reaching for generic glue. Boards can look similar while using different materials or construction, so appearance alone isn’t enough to identify the right adhesive. If you can’t establish compatibility from the documentation, pause before applying anything and use professional repair support.
How long should an inflatable SUP patch cure before use?
There’s no single waiting time that applies to every inflatable SUP repair. The repair product’s instructions set the required curing time and conditions, so follow them rather than relying on a general estimate. Don’t inflate, load or paddle the board prematurely, even if the patch looks secure. Once curing is complete, follow the board maker’s guidance for inspecting the patch and checking for leaks before returning the SUP to the water.
Can you patch a leak near an inflatable SUP seam?
A leak near a seam may involve more than an isolated puncture, because the damage can affect the board’s construction. Don’t assume a routine surface patch is suitable for every seam leak. If the seam is separating, the source is unclear or you can’t tell how the area is built, stop DIY work and keep the board off the water. Arrange professional assessment before using it again.
What happens if an inflatable SUP patch keeps leaking?
A persistent leak may indicate that the patch or adhesive isn’t compatible, the surface preparation was unsuitable, curing wasn’t complete, or there’s additional damage. Stop using the board and inspect it only when safe, following the repair product’s directions. Don’t keep layering on patches, as this may hide the fault without resolving it. If the leak continues or its cause is unclear, arrange a professional assessment before paddling.
How do you find a puncture in an inflatable SUP?
Inspect the board carefully in a clean, dry setting, using only leak-finding methods allowed by the board maker. Check visible scuffs and likely impact areas, as well as the seams and valve area, without stretching the fabric or probing the surface. A suspected puncture may not be the only leak. If you can’t locate the source or the damage appears to involve a seam or valve, use professional repair support before attempting a patch.