
How to Patch a PVC Boat: A Practical Repair Guide
A patch that looks secure on the bank can still lift once the tube is back under pressure. Material compatibility, careful surface preparation and proper curing all matter. If you’re unsure whether the fabric is PVC, or whether the damage is suitable for a home repair, pause before opening the adhesive. Knowing how to apply a patch to a PVC boat starts with identifying the fabric and assessing the damage, then matching the repair materials to the boat.
This guide covers how to prepare the surface, choose and position a compatible patch, and follow the adhesive maker’s bonding and curing instructions. It also explains common shortcuts that can undermine a repair and how to recognise damage that needs specialist attention. A straightforward puncture may suit a careful DIY approach; seam damage, extensive tears or a leak that persists call for professional inflatable-boat repair.
Key Takeaways
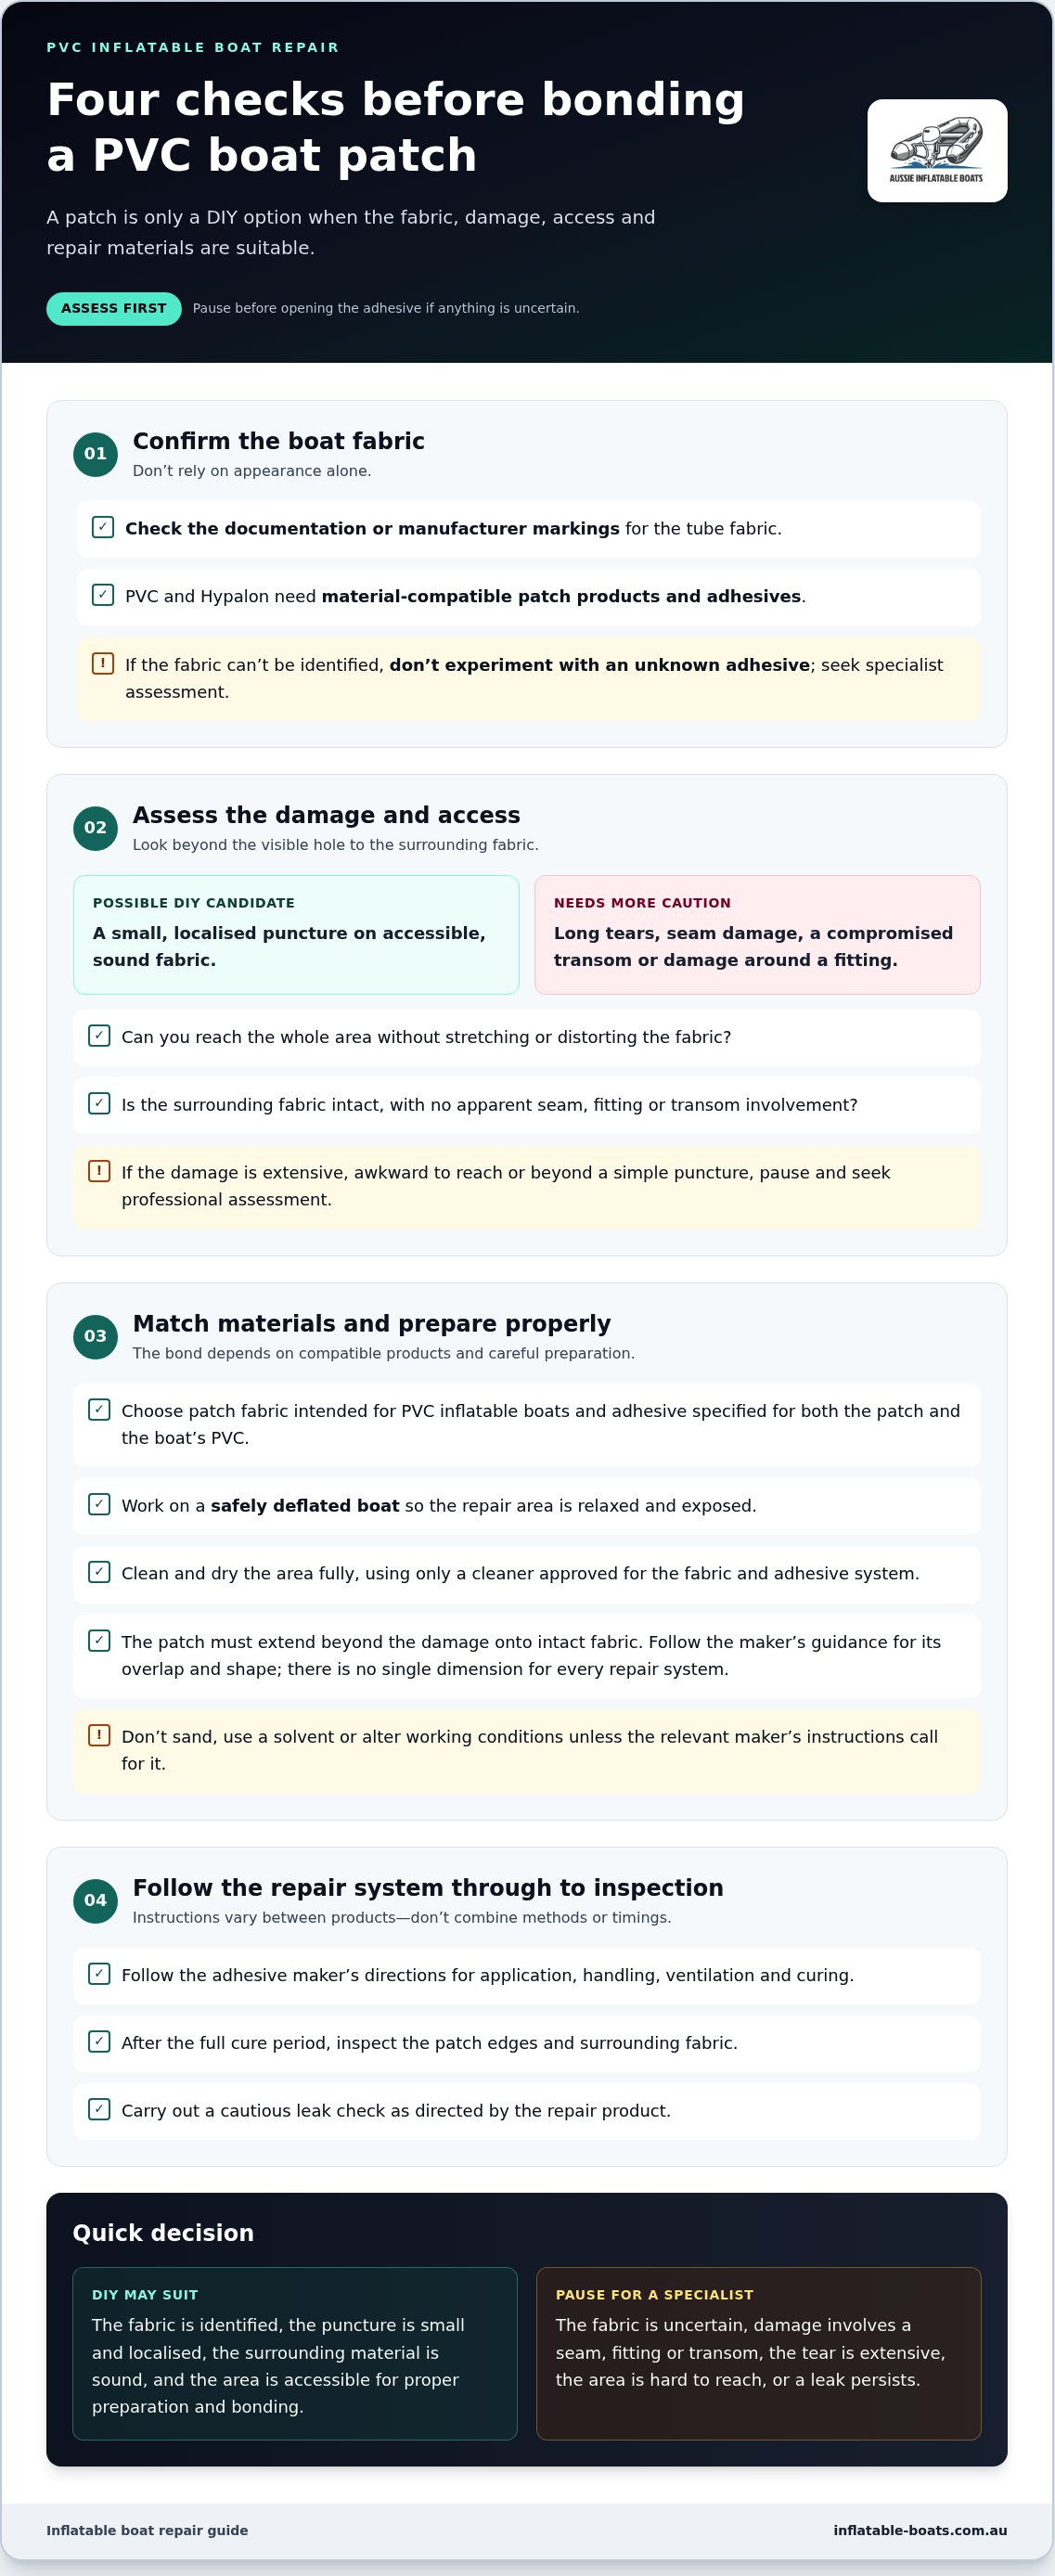
- Check the boat fabric and damage before choosing a DIY repair. A patch is suitable only when the materials are compatible and the area is accessible.
- Use PVC-compatible patch material and adhesive, and follow the adhesive maker’s instructions for preparation, patch dimensions and curing.
- A straightforward puncture may be manageable at home, while seam or fitting damage, extensive tears and hard-to-reach leaks are better assessed by a repair specialist.
- Work on a safely deflated boat so the repair area is relaxed, exposed and easier to prepare and bond evenly.
- After the full cure period, inspect the patch edges and surrounding fabric, then carry out a cautious leak check as directed by the repair product.
Before patching a PVC boat, assess the fabric and damage
The aim is to repair localised damage on accessible PVC, not simply cover whatever looks like a hole. Identify the material, then inspect the damage and the surrounding fabric. A small puncture in sound fabric is very different from a tear that reaches a seam or a fitting that has started to pull away.
A patch repair bonds compatible PVC material over prepared fabric to cover localised damage. The bond depends on matching both the patch and adhesive to the boat’s material. Choosing products for PVC before confirming the fabric can lead to an unsuitable repair, so don’t rely on appearance alone.
How to check whether the boat is PVC
Start with the boat’s documentation or manufacturer markings. They may identify the tube fabric and help you choose repair materials. PVC and Hypalon need material-compatible patch products and adhesives. Although Polyvinyl chloride (PVC) is a distinct material with established uses, a boat’s surface appearance alone can’t reliably confirm its construction.
If the documentation and markings don’t identify the material, don’t experiment with an unknown adhesive. A specialist assessment can help determine the fabric and suitable repair approach before bonding begins.
Which PVC boat damage may suit a patch?
A small, localised puncture on accessible, sound fabric is the clearest DIY candidate. Check that the area around it is intact and that you can reach it to clean, dry and prepare the surface properly.
Long tears, seam damage, a compromised transom or damage around a fitting need more than a quick cover. These areas may involve joins or structural components, so seek professional assessment rather than treating them as ordinary punctures.
Use these questions to assess the repair area:
- Can you identify the fabric with reasonable confidence?
- Is the damage localised, with no apparent seam, fitting or transom involvement?
- Can you expose and reach the whole area without stretching or distorting the fabric?
- Can the surface be cleaned and dried as the adhesive maker directs?
If any answer is no, pause before applying adhesive. An awkward position can make accurate preparation and even bonding difficult, while damage beyond a simple puncture may need specialist repair. Assessing the material and damage first helps you decide whether a home repair is appropriate.
Choose compatible PVC patch material and prepare the bonding surfaces
A reliable bond starts before you open the adhesive. Choose patch fabric intended for PVC inflatable boats and an adhesive specified for both that fabric and the boat’s PVC. Products made for another material may not bond as intended, even if they look similar or are marketed for inflatable craft.
The adhesive must match both the boat fabric and the patch material. Follow the repair system’s instructions for cleaner suitability, application, handling and curing. Don’t assume one adhesive formula, surface treatment or set of timings suits every PVC boat. The NRS Inflatable Boat Repair Guide also provides repair guidance, but the instructions supplied with your adhesive and patch materials apply to your repair.
The patch must extend beyond the damaged area so it can bond to intact fabric around the puncture. There isn’t one dimension that applies to every repair system, so use the adhesive or patch maker’s guidance for the required overlap and shape. Don’t use a measurement intended for a different product.
What to gather before starting
Prepare everything before applying adhesive so you can position the patch without rushing. Gather PVC-compatible patch material, its specified adhesive, a clean cloth and suitable application tools. Masking aids can help mark placement or contain adhesive, but use them only if the product instructions allow it. Check the adhesive label for cleaner compatibility, ventilation and protective equipment.
Choose a clean, dry, stable workspace where the boat can rest without shifting and the repair area is easy to reach. Follow the product’s ventilation and handling directions, including any precautions for applying or storing the adhesive. Keep the area clear to reduce the chance that dust or loose items contaminate the prepared surface.
Clean and prepare without compromising the fabric
Remove dirt and moisture from the repair area, then let the fabric dry fully. Use only a cleaner approved for both the boat fabric and the chosen adhesive system. A product that seems suitable for general use may still be wrong for a particular repair, so check the label or manufacturer instructions instead of improvising.
Preparation methods vary. Don’t sand the fabric, use a solvent or alter the working conditions unless the relevant maker’s instructions call for it. Extra treatment isn’t automatically better: an unsuitable cleaner or surface-preparation step may affect the fabric or bonding process. Follow the complete instructions for your repair system rather than combining timings or methods from different products.
Once prepared, keep the surface clean and dry until bonding begins. For damage or repair needs beyond a simple DIY patch, explore professional inflatable-boat repair support.
DIY PVC boat patch or professional repair: choose the right approach
The right repair route depends on more than the size of the visible hole. Consider where the damage sits, whether the surrounding fabric is sound and whether you can complete the adhesive maker’s process accurately. A simple patch may suit an accessible puncture, but damage involving seams, fittings or structural areas calls for a more cautious assessment.
| Damage | Access and complexity | Practical approach |
|---|---|---|
| Small, localised puncture | Usually straightforward if the fabric around it is sound and the area is easy to reach. | A DIY patch may be reasonable if you can follow the repair-system instructions. |
| Difficult placement | Limited access can make cleaning, accurate positioning and even pressure harder. | Consider specialist assessment if you can’t prepare or bond the area properly. |
| Seam or fitting damage | Joins and attached components can make the repair more complex than covering a puncture. | Seek professional assessment rather than treating it as a routine patch. |
| Extensive tear | A larger damaged area can require a more involved repair and careful evaluation of the surrounding fabric. | Professional repair is the more practical starting point. |
When a straightforward DIY patch may be reasonable
A home repair may suit a small, localised puncture on accessible PVC fabric that remains sound around the damage. You’ll also need to follow the chosen adhesive system’s complete directions, including preparation, application and curing. Suitability depends on the fabric’s condition, the damage location and the repair product’s instructions, not just on whether the hole looks small.
When specialist assessment is the more practical choice
Seam failures, concerns around the transom, extensive tears and damage close to fittings deserve professional assessment. These locations can involve joins or structural components, and a patch applied without understanding the underlying issue may not address the cause of the leak. An inside patch can also be more challenging than an outside patch because restricted access and visibility make preparation and accurate placement harder.
Previous patches that have lifted, or a leak that remains after the adhesive has had its full specified cure, are reasons to pause before adding more material. Repeated patching may conceal a broader issue rather than resolve it. Inflatable Boats provides professional inflatable-boat repairs for punctures and structural concerns. For help with a repair, use the inflatable-boat repair contact page.
Knowing how to apply a patch to a PVC boat is useful, but a complex repair may be better left to a specialist. Choosing the right route early helps avoid making the damage harder to assess or repair.
How to patch a PVC boat, step by step
Once you’ve confirmed the repair is suitable and the materials are compatible, work methodically. Keep the adhesive maker’s instructions beside you: quantities, coat count, flash-off periods and curing times vary between products. Use the process below as a sequence, not as a substitute for the directions supplied with your repair system.
- Make the repair area safe and accessible. Move the boat to a stable work area and deflate it as required by the boat maker. The fabric should be relaxed enough to expose the damage without stretching, folding or straining the tube. Position the boat so you can comfortably reach the whole repair area.
- Check the repair site again. Look over the puncture and surrounding fabric before bonding. If you find a split seam, fitting damage, a larger tear or compromised fabric, stop and seek specialist assessment rather than continuing with a basic patch.
- Prepare the surfaces. Remove dirt and moisture, then let the area dry fully. Use only a cleaner and preparation method approved for the boat fabric and chosen adhesive. Follow the product directions for ventilation, handling and protective equipment.
- Dry-position the patch. Place it over the damage without adhesive and check that it covers the affected area with the overlap specified by the maker. Confirm you can position it accurately and reach all edges. Make adjustments now, not after applying adhesive.
- Apply adhesive and bond. Follow the specified application sequence, including which surfaces receive adhesive, how much to use, the number of coats and any flash-off period. Bring the surfaces together carefully. Avoid folds, trapped air or shifting the patch once it is in place.
- Keep the repair still while it cures. Leave the bonded area undisturbed for the full curing period stated by the adhesive maker. Don’t inflate, load or test the boat before the instructions permit it. Cure times and conditions differ between adhesive systems, so don’t rely on a generic estimate.
- Inspect before returning the boat to use. After the stated cure period, check the patch edges and surrounding fabric for lifting, gaps or other visible concerns. Follow the repair product’s directions for any cautious leak check, and don’t use an improvised pressure test.
For a visual companion to these written steps, the site’s inflatable boat repair videos can help you follow the process. Use them alongside, not instead of, the instructions supplied with your adhesive and patch material.
If the damage proves more complex than a straightforward patch, explore professional inflatable-boat repair support before putting the boat back into service.
After patching a PVC boat, inspect the repair and plan your next step
Check the bond carefully before the boat returns to use. Wait until the adhesive has reached its full stated cure, then inspect the patch and nearby fabric in good light. A lifted edge or a leak that persists is a reason to stop, not to head out and see whether the repair holds on the water.
Check the bonded area before returning to use
Look around the full perimeter for lifted edges, wrinkles, gaps or signs the patch has shifted. Examine the surrounding fabric for damage that extends beyond the patch, too. A neat appearance is useful, but it doesn’t prove that a complicated tear, seam problem or fitting issue has been repaired.
If the boat and adhesive instructions allow an inflation or leak check, follow their method and limits. Don’t add pressure beyond the boat maker’s guidance or use an improvised test. If you notice escaping air, movement at the edges or another sign of a leak, stop the check and keep the boat out of use until the repair has been assessed.
Know when repair support can help
A patch that lifts or continues to leak after the full cure period needs further attention. So does damage that reaches a seam, fitting or structural area. Avoid adding another patch without understanding why the first repair didn’t hold; the underlying damage may need a different approach.
Inflatable Boats provides repair support for punctures and structural components. If the repair remains uncertain or the damage goes beyond a straightforward patch, professional assessment can help you decide on a sensible next step.
Use this final check before considering the boat ready:
- The adhesive has completed its stated cure period.
- The patch edges appear bonded, with no visible lifting, gaps or wrinkles.
- The surrounding fabric shows no newly apparent damage beyond the repair.
- Any inflation or leak check follows the boat and repair-product instructions, with no sign of continuing air loss.
If any check raises concern, don’t use the boat until the issue has been assessed. Knowing how to apply a patch to a PVC boat includes recognising when a DIY repair needs specialist attention. For help with a persistent puncture or structural damage, contact Inflatable Boats about repair support.
Get your boat ready for the next outing
A repair is only one part of keeping an inflatable boat ready for the water. Check its condition before heading out, and attend to new damage before it grows or interrupts your plans. If you’re deciding how to apply a patch to a PVC boat, let the condition and location of the damage guide your choice rather than reaching for a quick fix.
For a simple, suitable puncture, a careful repair can be a practical step towards getting back on the water. If the issue calls for more than a straightforward patch, Inflatable Boats provides repair support to customers nationally across Australia.
Explore inflatable boats, accessories and repair support and get in touch with Inflatable Boats for help with a repair.
Frequently Asked Questions
Can I use any adhesive to patch a PVC boat?
No. Use an adhesive intended for PVC boat fabric and compatible with the patch material. General-purpose glues may not flex or bond appropriately to an inflatable tube, and a product for another fabric may be unsuitable. Read the adhesive maker’s directions for surface preparation, application and curing, and don’t mix instructions from different repair systems. If you can’t establish compatibility, pause rather than trying the adhesive on the boat.
How much bigger should a PVC boat patch be than the hole?
There isn’t one overlap measurement that applies to every patch and adhesive system. The patch must cover the damaged area and leave enough surrounding fabric for a bonded margin, but the maker’s instructions should determine its dimensions. For an irregular puncture or short slit, consider the full extent of the damage, not just the visible opening. Don’t rely on a measurement from another brand’s repair guide as a universal specification.
Can I patch a PVC boat seam?
A seam leak shouldn’t be treated as an ordinary puncture. The leak may come from a separation along the join, and a surface patch might cover the symptom without addressing the underlying seam. Avoid applying adhesive across a seam unless the repair system specifically allows that method. If you see separation, bubbling or continuing air loss along a join, stop using the boat and have the area assessed before planning a repair.
What happens if a PVC boat patch still leaks after curing?
Keep the boat out of use and inspect the repair only as the boat and adhesive instructions allow. A continuing leak can point to an edge that hasn’t bonded, damage extending beyond the patch, or a separate leak elsewhere, such as a valve. Don’t keep inflating the tube or cover the area with another patch without identifying the source. If the leak persists, arrange a specialist assessment rather than relying on the repair.
Can I apply a PVC boat patch when the fabric is damp?
No. Damp fabric can interfere with surface preparation and bonding, so wait until the repair area is fully dry before applying adhesive. This includes moisture around the puncture, not only water visible on the surface. If the boat has been exposed to rain or spray, dry the area and check it again before starting. Also follow the adhesive maker’s instructions about suitable working conditions and handling.
Can I use a PVC patch on a Hypalon inflatable boat?
Not unless the patch and adhesive are specifically approved for Hypalon as well as the repair method. PVC and Hypalon are different fabrics, and a repair product intended only for PVC may not provide a suitable bond on Hypalon. Check the boat’s documentation or manufacturer markings before choosing materials. If you can’t identify the fabric, don’t experiment with an adhesive; seek specialist advice about material identification first.
Is a patch suitable for a large tear in a PVC boat?
A large tear often needs professional assessment rather than a basic patch. Its length, position and the condition of the fabric around it all affect the repair approach; a tear near a seam or fitting can add further complexity. Don’t judge suitability by the opening alone. If the fabric is distorted, weakened or split beyond the visible tear, keep the boat out of use until the damage has been assessed.