
How to Install, Align, and Blend an iSUP Fin Box Repair
A fin-box repair is only as reliable as the fit and alignment of the replacement. Fixing a broken iSUP fin box starts with assessing the damage, preparing the attachment area and securing a compatible replacement so it sits straight and firmly.
It’s natural to focus on the broken fitting, but the surrounding material matters too. If the damage extends beyond the box, a thorough repair may involve removing it, replacing compromised material and installing a new fin box.
This guide covers how repair materials are chosen, how a damaged attachment area is prepared, and how a replacement is aligned and secured. You’ll also learn what affects repair quality, helping you understand the steps before your board is ready to return to the water.
Key Takeaways
- Damage assessment helps determine whether the fin box alone needs replacing or whether the surrounding material also needs repair.
- Accurate positioning matters: a professional aligns the replacement with the board’s centre line and checks that it sits evenly.
- Fibreglass cloth, resin and suitable filler help secure the replacement and reinforce the repair area.
- Careful sanding and blending smooth the repaired surface while preserving the board’s shape.
- Professional inflatable boat repairs can help when damage extends beyond a simple fin-box replacement.
Professional installation and alignment of a replacement fin box
A dependable replacement needs a stable attachment area, accurate alignment and a secure bond. Professional repairs follow a careful sequence, from assessing the damage to checking the finished fit.
How a professional checks fin box safety
Keep the board out of use if the fin box is cracked or loose. Movement can worsen damage around the fitting, and a fin that shifts may affect control on the water. A professional assesses the box and surrounding material to determine whether replacement is needed. To help prevent further damage, don’t force a fin into the box; it should fit correctly and sit securely.
Professional installation and alignment of the replacement fin box
Ask for the damaged box and surrounding cavity to be assessed before installation begins. A thorough repair may require removing the box, replacing surrounding foam and fitting a new box. During fixing a broken iSUP fin box, the professional checks alignment, seating and gaps before laminating the repair.
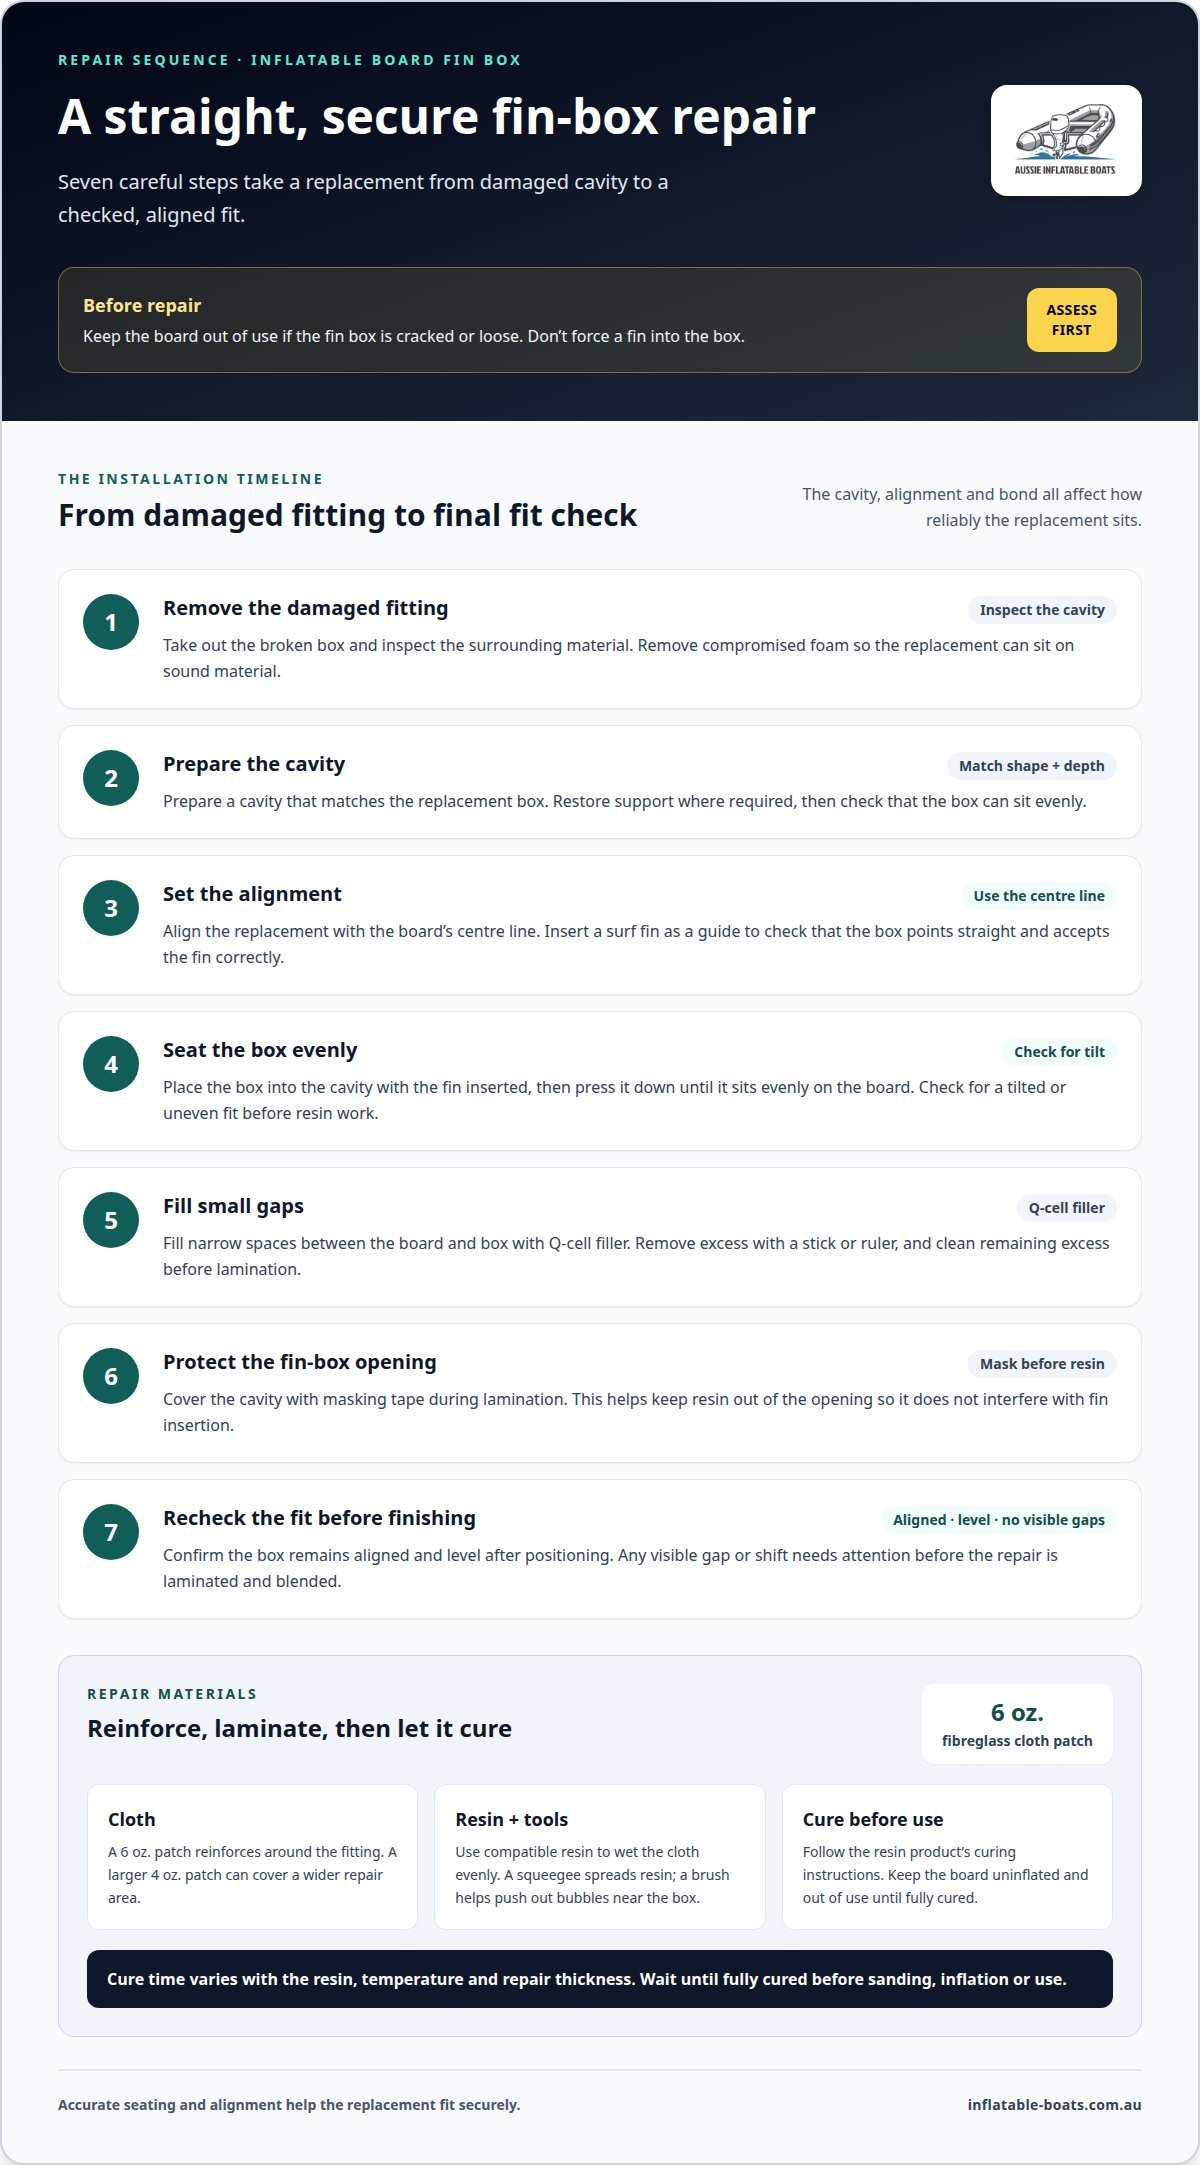
- Remove the damaged fitting. The professional takes out the broken box and inspects the cavity. Any compromised surrounding foam is removed so the replacement can sit on sound material.
- Prepare the cavity. The replacement needs a cavity that matches its shape and depth. The professional restores the surrounding support where required, then checks that the box can sit evenly.
- Set the alignment. The professional aligns the replacement with the board’s centre line. A surf fin is inserted as a guide, helping show whether the box points straight and accepts the fin correctly.
- Seat the box carefully. The box is placed into the cavity with the fin inserted, then pressed down until it sits evenly on the board. This check helps reveal a tilted or uneven fit before resin work.
- Fill small gaps. Small spaces between the board and box are filled with Q-cell filler. The professional removes excess with a stick or ruler, keeping the surface neat around the fitting.
- Protect the fin-box cavity. Masking tape keeps resin from entering the cavity during lamination. This helps preserve the opening and prevents resin from interfering with fin insertion.
- Check the fit before finishing. The professional confirms that the box remains aligned and level after positioning. Any visible gap or shift needs attention before the repair is laminated and blended.
Materials a professional uses for fin box repair
Resin, fibreglass cloth and Q-cell filler have different roles in fin-box repairs. The suitable materials depend on the damage and how the replacement box fits.
Cure time varies with the resin, temperature and repair thickness. Keep the board uninflated and out of use until the resin has fully cured according to its product instructions.
- Select the fibreglass cloth. A professional uses a 6 oz. fibreglass cloth patch over the fin-box area. This patch reinforces the repair around the fitting. For a wider repair area, a larger 4 oz. cloth patch can cover more of the surrounding surface. The patch size and shape should suit the damaged area, rather than extend unnecessarily across intact material.
- Choose resin for the repair system. Resin bonds the fibreglass cloth and helps form a continuous repair layer. The professional selects resin compatible with the cloth and the board materials. They apply enough to wet the fibres evenly, avoiding dry patches that could weaken the laminate or pools that add excess material.
- Use Q-cell filler for small gaps. Q-cell filler fills narrow spaces between the board and the fin box. The professional removes excess filler with a stick or ruler before applying fibreglass patches. Acetone is used to clean remaining excess Q-cell filler from the repair area before lamination begins.
- Keep resin out of the box. Masking tape protects the fin-box cavity during lamination. Resin inside the opening could obstruct fin insertion, so the professional covers the cavity while leaving the surrounding repair surface accessible. The tape also helps define a cleaner edge around the box.
- Apply resin with suitable tools. A squeegee spreads resin evenly over the fibreglass patches, while a brush helps push out bubbles near the fin box. These tools help the cloth lie flat against the board. A sanding-resin hot coat is then brushed over the entire repair area to prepare its surface for finishing.
- Allow the materials to cure. The professional follows the resin product’s curing instructions before sanding, inflation or use. Temperature and the amount of resin affect how quickly a repair cures. Rushing this stage can disturb the laminate, so the board remains untouched until the resin has fully set.
If the damage calls for professional attention, inflatable boat repair services are a relevant next step for assessing repair needs.
How a professional prepares a damaged fin box cavity
A professional identifies the board’s construction and the extent of the damage before preparing the attachment area. This distinction matters: a hard surfboard-style fin-box repair and an inflatable SUP repair may require different preparation methods.
- Identify the repair area. The professional examines the box, its edges and the surrounding material. They determine whether damage is limited to the fitting or extends into the board. This assessment guides cavity preparation and helps avoid removing sound material unnecessarily.
- Match preparation to the board. An inflatable SUP’s construction differs from a rigid surfboard. The professional identifies the materials around the fin box before choosing how to expose and prepare the damaged area. Surfboard preparation methods should not be transferred automatically to an inflatable board.
- Remove damaged material carefully. The professional clears material that can no longer support the repair, while preserving sound structure around the opening. A clean, well-defined cavity gives the replacement a more consistent seat. The amount removed depends on the damage, not a standard cut-out size.
- Check for moisture. Water ingress can affect the repair area, so the professional assesses whether the cavity needs drying before bonding. Warming a waterlogged board to about 40°C can help water drain. A board being dried after water ingress should not be heated above 45/50°C.
- Prepare the surface for bonding. The professional removes loose residue and prepares the repair surface to suit the board’s materials and repair system. On a surfboard tail around the fins, 40-grit sandpaper is used before fin-box repair. That grit detail applies to the surfboard method, not as a universal instruction for inflatable SUP fabric.
- Keep the cavity clean. Dust, loose fibres and leftover material can interfere with a bond. The professional clears debris from the opening and surrounding repair area before installing the replacement. This also makes it easier to assess the cavity’s edges and spot any remaining weak material.
- Confirm the replacement can seat evenly. Before bonding, the professional checks the prepared cavity against the replacement box. An uneven base or an obstruction can prevent a stable fit. Any remaining high point or gap needs attention before installation proceeds.
- Protect the prepared area. Once the cavity is clean and ready, the professional keeps it free from dust and handling residue until installation. This preserves the prepared bonding surface. Careful preparation gives the next stage a stable starting point, without assuming every inflatable SUP uses rigid-board materials.
How a professional sands and blends the repair
Once the resin has cured enough for finishing, a professional levels the repair and smooths its edges. Coarse sanding removes high spots; finer sanding smooths the surface.
- Remove the masking tape at the right stage. The professional removes masking tape once the resin has gelled, before sanding the fin-box repair. This keeps tape from becoming trapped beneath the finished surface. The fin-box cavity stays protected during lamination, then becomes accessible for sanding and inspection.
- Level the raised repair material. An angle grinder is used to level the repair flat. The professional controls the tool around the fin box, removing high spots without cutting into the box or surrounding board. The aim is a level repair surface, not unnecessary removal of sound laminate.
- Keep the grinding area controlled. The repair is worked in stages so the professional can assess the surface as material comes away. Around the fin box, careful tool control helps maintain the fitting’s edge. The professional checks for remaining raised resin before moving to finer sanding.
- Smooth the surface with 150-grit sandpaper. After levelling, 150-grit sandpaper smooths and blends the repair area. This stage reduces the marks left by coarser shaping and softens the transition between the repair and the board. The professional works across the patch rather than leaving a sharp ridge at its edge.
- Follow the board’s shape by hand. Hand sanding along the surfboard’s concaves helps preserve its original channels. A flat tool can cut across those contours, changing the surface around the repaired fin box. Working by hand lets the professional follow the existing shape as the repair edges are blended.
- Blend the tail edges with a sanding block. A sanding block smooths the edges of the surfboard tail after the repair is sanded. It helps even out the transition where the repair meets the surrounding surface. The professional uses it to refine the tail without rounding the fin-box opening or flattening the board’s contours.
- Inspect the finished blend. The professional checks the repair from several angles for raised spots, sharp edges and visible transitions. Around the fin box, the surface should meet the fitting cleanly, without sanding debris obstructing its cavity. If an uneven patch remains, it needs further controlled blending before the finish is considered complete.
These sanding steps apply to a rigid surfboard-style resin repair. An inflatable SUP is built differently, so its construction and materials should guide the finishing method.
How does a professional identify damage to an inflatable SUP fin box?
A professional assesses the fin, box and surrounding board together. Visible cracks are important, but movement, poor fit and damage extending beyond the fitting also affect the repair decision.
- Inspect the fin box and its edges. The professional looks for cracks, splits, lifted edges and visible gaps around the fitting. They note where each mark begins and ends. Damage at the box itself differs from a tear or separation in the surrounding board material, so the boundary needs careful inspection.
- Check whether the box moves. The professional assesses whether the fitting feels secure or shifts in relation to the board. A loose box can indicate damage to its attachment or nearby material. They avoid forcing it, since unnecessary movement may enlarge an existing split or disturb the surrounding structure.
- Assess the fin’s fit. The fin is checked for correct seating and unwanted movement within the box. A fin that will not sit properly may point to a damaged box, but the fin itself can also be the source of a poor fit. The professional distinguishes those possibilities before recommending repair.
- Examine the surrounding board. The professional checks the area around the fitting for punctures, tears, distortion or separation. They assess whether the visible damage is confined to the fin-box attachment or extends into nearby material. That distinction helps determine whether the repair can focus on the box or needs broader attention.
- Look for signs of water ingress. If the damage could allow water into the board, the professional assesses the affected area before planning work. Water ingress can change what preparation is needed. A board being dried after water ingress should not be heated above 45/50°C.
- Consider the board’s construction. An inflatable SUP is not prepared like a rigid surfboard. The professional identifies the materials and construction around the fin box before selecting a repair approach. This prevents surfboard resin and sanding procedures from being applied automatically to an inflatable board.
- Decide whether use should stop. A cracked or loose fin box should not be treated as ready for use. The professional considers the crack, movement, fin fit and surrounding damage together. Until the fitting is assessed and repaired, using the board could worsen damage or compromise the fin’s secure attachment.
- Record the damage before repair. The professional notes the location and extent of cracks, movement and surrounding material damage. This assessment provides a basis for choosing between a local repair and more extensive work. For help addressing fin-box damage, explore professional repair support.
Inflatable Boats
Inflatable Boats is a practical next step when fin-box damage needs professional assessment or the surrounding inflatable board also needs attention. Its inflatable boat repairs address repair needs, while inflatable boat spare parts and accessories support broader equipment requirements. The right approach depends on the damage: a loose fitting, a cracked box and damage extending into nearby material may call for different repair decisions.
If you’re unsure about the extent of the damage, describe the issue and your board’s condition when you contact Inflatable Boats. That gives the repair discussion a useful starting point without assuming every fin-box problem needs the same solution.
Contact Inflatable Boats to discuss the repair you need.
Get your board ready for the next outing
Before your next paddle, consider whether the fin box needs professional assessment. If you’re deciding how to approach fixing a broken iSUP fin box, explain what you’ve noticed, such as a crack, movement or a fin that no longer fits properly. These details help start a practical discussion without assuming there’s one standard repair.
Inflatable Boats also sells inflatable boats, accessories and spare parts for broader on-water equipment needs. For a fin-box concern, contact the team to discuss the repair and describe how the board is behaving. Clear details give the conversation a useful starting point.
Contact Inflatable Boats for repair help, then look ahead to getting back out on the water with confidence.
Frequently Asked Questions
Can a broken iSUP fin box be repaired, or does it need replacement?
Some fin-box damage can be repaired, while a cracked or detached box may need replacing. The decision depends on whether the box can hold the fin securely and whether the attachment area is sound. A surface mark, for example, is different from a split reaching the mounting area. A professional assesses the box and surrounding board together before deciding on the repair.
What materials and tools does a professional need to repair an inflatable SUP fin box?
The materials and tools depend on the board’s construction and how its fin box is attached. A professional identifies the materials first, then selects compatible products and methods. The work may involve carefully removing the box, preparing the attachment area, positioning the replacement and finishing the repair. This assessment matters because patching a puncture in the inflatable skin may not fix damage to the fin-box attachment.
How does a professional remove and replace an inflatable SUP fin box?
A professional first identifies how the fin box is attached, then removes the damaged fitting while limiting disturbance to sound material. They prepare the attachment area, position a compatible replacement and secure it using a method suited to the board’s construction. The final assessment checks that the fitting is stable and that the fin fits correctly. The process varies according to the board’s design and the damage.
Which adhesive or PVC repair kit does a professional use for an iSUP fin box?
No single adhesive or PVC repair kit suits every iSUP fin-box repair. A professional matches the bonding product to the materials and the box’s attachment method. A kit for a small PVC puncture may not be suitable for a structural fin-box repair. Identifying the board material and damaged joint helps determine the right repair system.
How long does an iSUP fin box repair take to cure before inflation and use?
Cure time varies with the resin, temperature and repair thickness. Keep the board uninflated and out of use until the resin has fully cured according to its product instructions.