
How to Inflate a Paddle Board Correctly: A Step-by-Step Guide
What if a board that looks firm still feels unstable once you’re on the water? Knowing how to inflate a paddle board correctly isn’t about judging by touch. The right pressure depends on your board’s own instructions, and a gauge helps you reach it without guessing.
It’s easy to feel unsure about the valve, pump connection or pressure reading, especially when you’re keen to get out on the water. A simple, repeatable process makes preparation straightforward. Inflate below the recommended pressure and your board may flex more than it should; exceed its stated limit and you risk putting unnecessary strain on it.
This guide covers how to prepare your board, set the valve, connect and use a manual or electric pump, and check the finished inflation. Follow the pressure guidance for your particular board rather than relying on a general PSI figure or how firm it feels. A few careful checks on shore can help you launch with greater confidence and focus on the paddle ahead.
Key Takeaways
- Learn how to inflate a paddle board correctly by following the pressure guidance for your specific board.
- Prepare a clear inflation area and work through a simple sequence to set up the valve and pump.
- Use the pressure gauge to check inflation, and recognise common issues such as a loose connection or mispositioned valve.
- Run through a final check, including securing the valve cap as instructed, before carrying your board to the water.
- Keep your board’s pressure instructions handy so your preparation routine is easy to repeat on future outings.
Why inflating a paddle board correctly matters
A paddle board can look ready before it has reached the pressure it needs. Correct inflation means bringing the board within the pressure range stated by its manufacturer, not stopping when it feels firm under your hand. That pressure supports the board’s intended shape and rigidity, helping you begin your session with confidence in your equipment.
There isn’t one pressure figure that suits every inflatable stand-up paddle board. Construction and design vary, so a number that’s right for one board may not be right for another. When learning how to inflate a paddle board correctly, start with the pressure range printed on your board or provided in its instructions, and use it as your guide throughout inflation.
Correct inflation means matching your board’s pressure guidance, not guessing by feel. This is the most dependable way to prepare your board without assuming that a general recommendation applies to your particular model.
What does correctly inflated mean for an iSUP?
An iSUP is an inflatable stand-up paddle board. Like other inflatable boats, it relies on air pressure to take shape, but the correct pressure is specific to the board. Look for the stated range on the board or in its instructions before pumping. Pressure is commonly measured in PSI, short for pounds per square inch. In plain terms, PSI describes the air pressure inside the board.
Touch is useful for noticing that a board is still soft, but it can’t tell you precisely how much pressure it contains. A board may feel quite firm while remaining below its stated range. Use a pressure gauge to compare the reading with the board’s instructions. The gauge gives you a clearer reference than squeezing the surface or judging by appearance alone.
Why pressure affects how the board feels
Adequate inflation helps the board hold the rigidity intended by its design. If it’s underinflated, it may feel softer and flex more under your weight. That can affect how the board responds beneath you, making it feel less reassuring to stand on or handle. It may also behave differently on the water, though the exact feel depends on the board and conditions.
Treat pressure as part of your preparation, not a performance setting to adjust by guesswork. If the board feels soft, check the gauge against the instructions rather than assuming every board needs the same top-up. More pressure isn’t automatically better: follow the stated range and don’t exceed it. Once you know your board’s guidance, you have a clear standard to return to before each outing.
How to inflate a paddle board correctly, step by step
A little preparation makes inflation easier and helps prevent avoidable pressure loss. Work through the sequence in order, using your board’s valve instructions and stated pressure range as your reference. The process applies whether you’re using a manual or electric pump, although the controls and connector may differ.
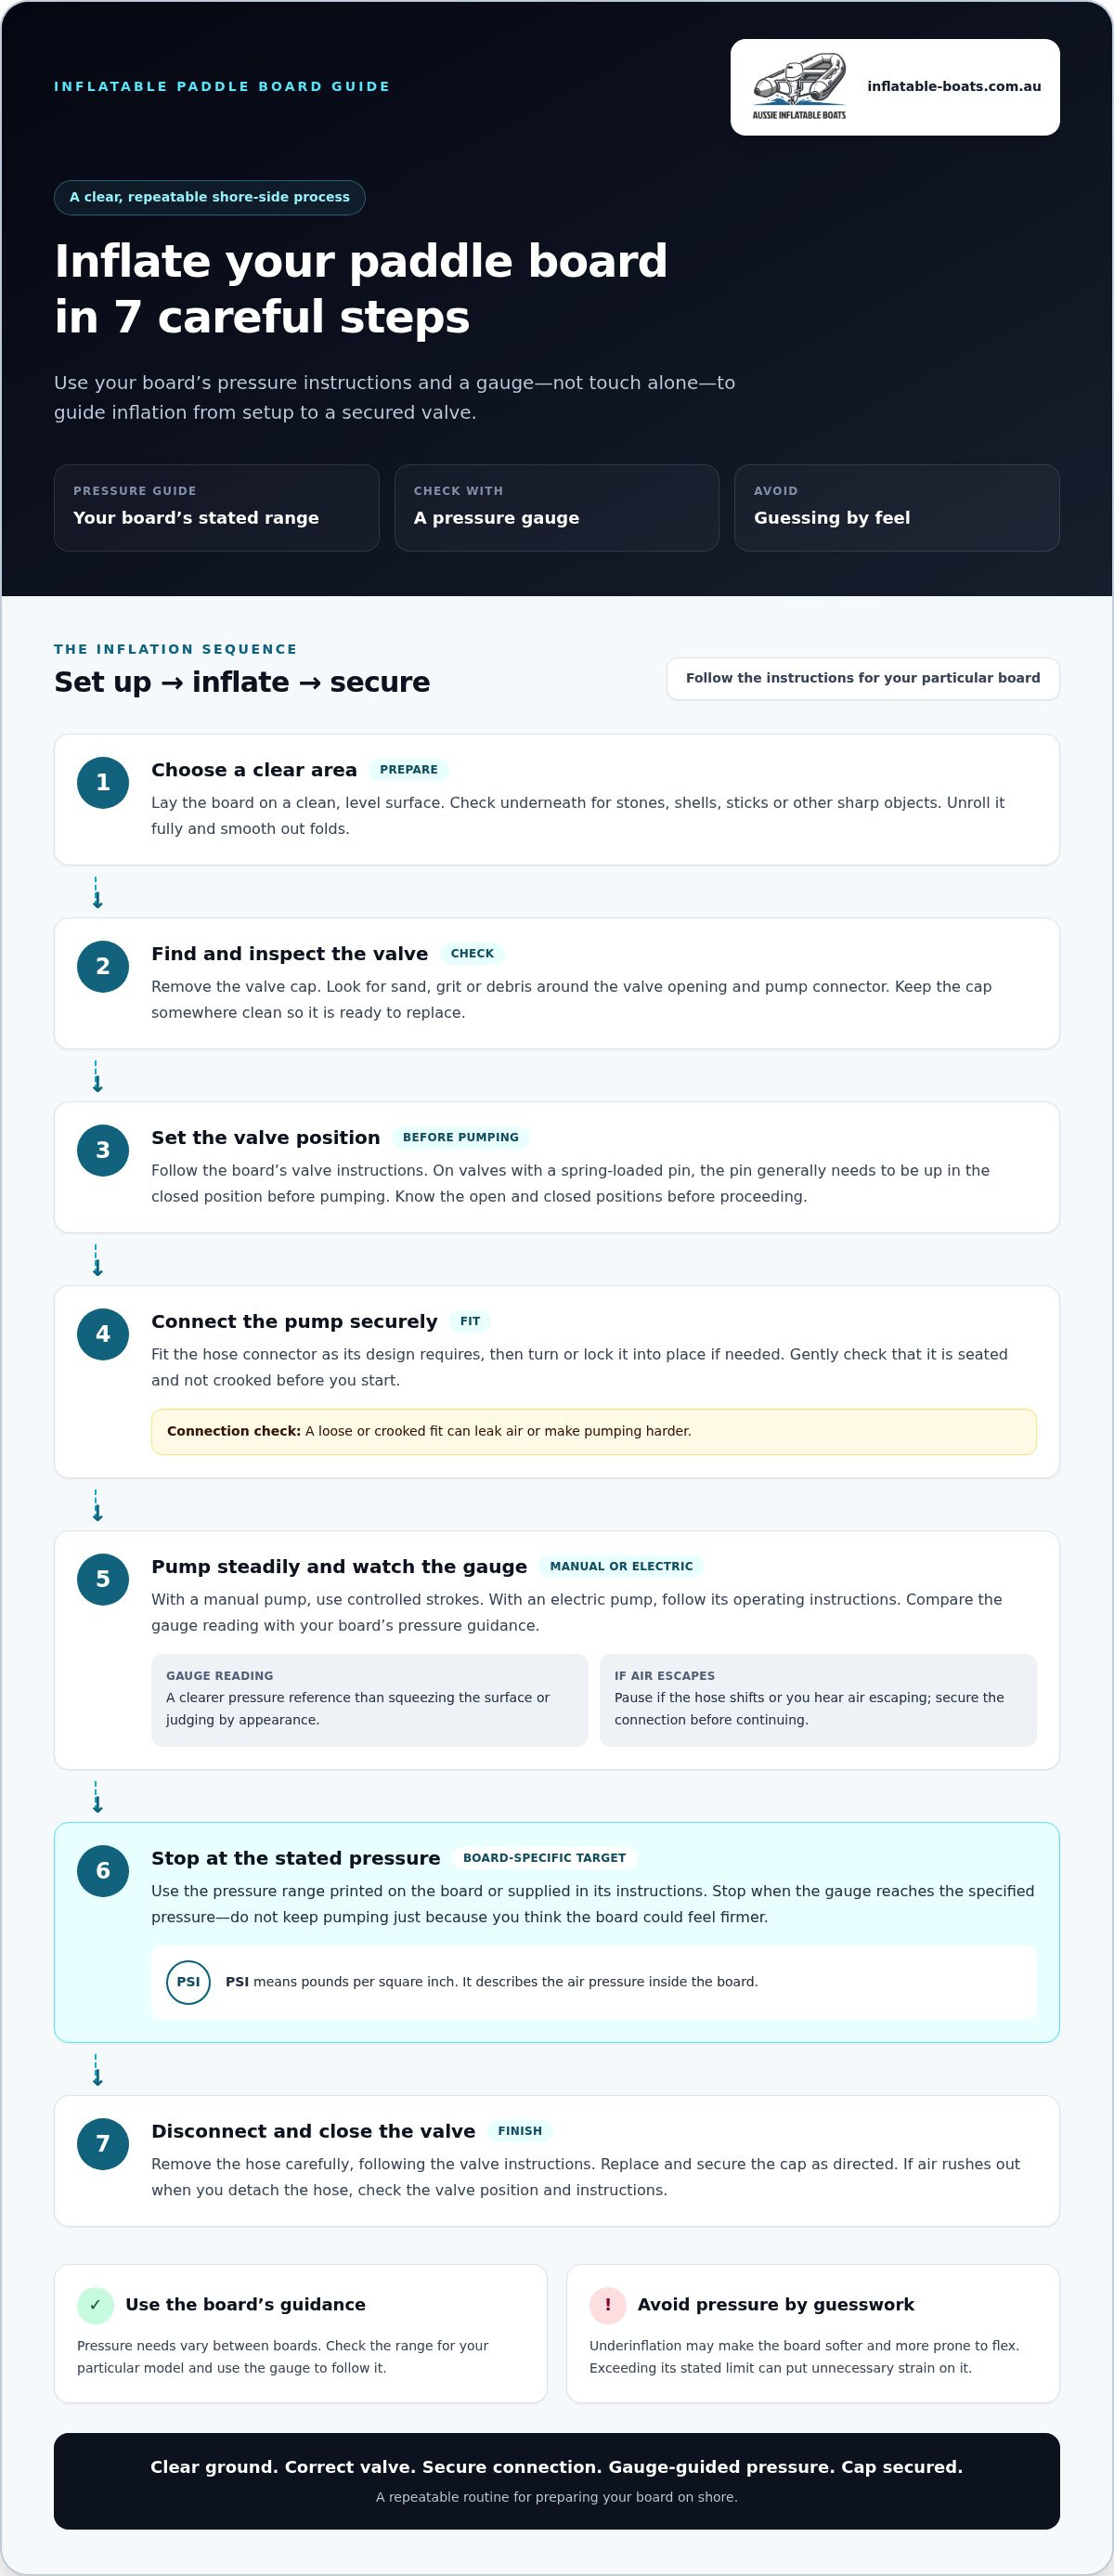
- Choose a clear area. Lay the board on a clean, level surface with enough room to move around it. Check underneath for stones, shells, sticks or other sharp objects that could press into the material. Unroll the board fully and smooth out any folds so you can reach the inflation valve without twisting or pulling the board.
- Find and inspect the valve. Locate the inflation valve and remove its cap. Check the valve opening and pump connector for sand, grit or other debris, as anything caught between the parts can interfere with a secure fit. Keep the cap somewhere clean so it’s ready to replace after inflation.
- Set the valve before attaching the hose. Follow the board’s instructions for the valve position. On valves with a spring-loaded pin, the pin generally needs to be up in the closed position before pumping; if it’s down, air can escape when you disconnect the hose. Make sure you understand the valve’s open and closed positions before proceeding.
- Connect the pump securely. Fit the hose connector to the valve as its design requires, then turn or lock it into place if needed. A loose or crooked connection can leak air or make pumping harder. Gently check that the hose is seated before you start.
- Inflate while monitoring pressure. Start pumping steadily. With a manual pump, keep your strokes controlled; with an electric pump, follow its operating instructions. Watch the gauge when available and compare its reading with the board’s stated pressure guidance. Pause if the hose shifts or you hear air escaping, then secure the connection before continuing.
- Stop at the board’s stated range. The pressure range printed on your board or supplied in its instructions takes precedence over general advice and how firm the surface feels. Stop once the gauge reaches the specified pressure. Don’t keep pumping simply because you think the board could feel firmer.
- Disconnect and close the valve. Remove the hose carefully, following the valve instructions, then replace and secure the cap as directed. If air rushes out when you detach the hose, check the valve position and instructions before trying again.
That’s the core routine: clear ground, clean connection, correct valve position and a pressure reading matched to your board’s guidance. If you’re considering a board for a future outing, browse the available inflatable paddle boards as part of your preparation.
Pressure gauges, pumps and common inflation mistakes
A pump gauge gives you a pressure reading to compare with your board’s own instructions. It’s more useful than pressing the deck and deciding by feel, which can’t tell you precisely how much pressure is inside. Gauges and pump designs vary, so focus on the reading and instructions for your equipment rather than assuming every setup works the same way.
How to use the pump gauge
As you inflate, watch the gauge and compare its reading with the pressure range stated for your board. The number shows the air pressure inside the board as it’s being pumped. Stop when the reading reaches the board’s specified range, and follow the pump instructions for reading the gauge and operating the pump. A digital display or dial may present the reading differently, so use the guidance supplied with that pump.
If the gauge doesn’t appear to respond, or the reading seems inconsistent with what you expect, pause rather than pumping blindly. Check that the hose is fitted securely and that air isn’t escaping at the connection. Then refer to the pump instructions to understand how its gauge operates. Don’t compensate for an uncertain reading by adding pressure based on how firm the board feels.
Inflation mistakes to avoid
Small oversights can make inflation confusing or leave you unsure whether the board is ready. Use this troubleshooting guide to identify the issue and choose a sensible next step:
- Using another board’s target: Don’t copy a pressure figure from a different board or an online example. Find the instructions for your own board and use its stated range.
- Forcing the pump fitting: If the connector won’t attach smoothly, stop. Check its position and the pump instructions instead of forcing it, which could damage or misseat the connection.
- Ignoring air escaping at the hose: A hiss near the connection can indicate the hose isn’t seated properly. Pause, refit it according to the instructions, then check whether the gauge responds as expected.
- Overlooking the valve: A valve that appears loose or won’t hold air needs attention before you continue. Check its position and the board’s valve guidance; don’t assume ongoing air loss is normal.
- Trusting hand-feel alone: A board can feel firm without being at the correct pressure. Use the gauge and compare its reading with the board’s guidance.
For how to inflate a paddle board correctly, the pump and gauge are tools, not substitutes for your board’s instructions. Manual and electric pumps have different operating methods, and gauge displays can vary. Secure the connection, read the gauge, investigate anything that seems wrong, and stop at the specified pressure. If the valve or connection still won’t hold air, don’t keep pumping and hope the problem resolves itself.
How to check your paddle board before heading out
Before carrying your board to the water, check that inflation is complete and the board is ready to handle. This final pause can catch loose connections, escaping air or visible damage while you’re still on shore. Use the pressure guidance for your board, not a number you’ve seen elsewhere, and follow its instructions for the valve and cap.
Final pressure and valve checks
Before disconnecting the pump, compare the gauge reading with the pressure range stated on your board or in its instructions. Once the reading is within range, remove the pump as directed. Check that the valve is closed as instructed, then fit and secure the valve cap. The cap should sit properly, without being forced or cross-threaded.
Listen and look around the valve after the hose is off. If you hear air escaping, notice the board losing firmness or see the pressure reading drop unexpectedly while the pump is connected, pause. Recheck the valve position and pump connection using their instructions. Don’t carry on to the water until you’ve resolved the issue and are confident the board is holding air.
Check the board’s overall condition
With the board inflated, visually inspect its surface, seams and fittings. Look for obvious cuts, punctures, separation or anything that appears different from the board’s normal condition. This is a basic visual check, not a way to diagnose hidden damage. If you notice a concerning change, avoid using the board until it has been properly assessed.
Use a short, consistent sequence before you lift the board:
- Confirm the gauge reached the board’s stated pressure range before removing the pump.
- Make sure the pump hose is completely disconnected and the valve is closed as directed.
- Check the valve cap is secured according to the board instructions.
- Look over the surface, seams and fittings for visible damage or unexpected changes.
- Pause if air escapes, the board softens or anything looks damaged, and address the issue before heading out.
These checks complement a sound inflation routine. Knowing how to inflate a paddle board correctly includes confirming the board holds air and that its valve is closed before you carry it to the water. Don’t treat a persistent leak or valve concern as a minor inconvenience or try to compensate by pumping further. Inflatable Boats provides repair services for punctures, valve issues and structural components. Leave the board ashore until the problem has been addressed.
Once the checks are complete, carry the board with the valve area protected from knocks and avoid dragging it across rough ground. For your next session, keep the board’s pressure instructions accessible so you can repeat the same dependable process. If you’re looking for an inflatable paddle board for future outings, explore the available paddle boards.
Make correct paddle board inflation part of your routine
A repeatable preparation routine takes the guesswork out of getting ready to paddle. Keep your board’s pressure instructions with your gear or save them somewhere easy to access, so you can refer to the right guidance each time. The steps stay familiar, while the pressure target remains specific to your board.
Build a simple pre-paddle inflation routine
Use the same order each session: clear a suitable area, unroll the board, check the valve and pump connector, then prepare the pump according to the board and pump instructions. Set the valve as directed before attaching the hose. As you inflate, compare the gauge reading with your board’s stated range. Don’t substitute memory, hand-feel or a pressure figure from another board for that guidance.
Once inflation is complete, remove the pump and secure the valve cap as instructed. Finish with a quick visual check of the board’s surface, seams and fittings. If you notice air escaping, unexpected softening or visible damage, pause and address the concern before heading out.
To make the routine easy to repeat, keep this short sequence in mind:
- Clear the ground and lay out the board.
- Check the valve and pump connection, then set the valve as directed.
- Inflate while comparing the gauge with the board’s pressure instructions.
- Remove the pump, secure the cap and check the board’s condition.
Simple and consistent: that’s the practical core of how to inflate a paddle board correctly. You can use the same order at home or at your launch spot, while still checking the instructions rather than assuming every board has the same requirements. A little preparation on shore helps you set off with greater confidence.
Find visual guidance and paddle board options
If seeing the process helps you follow it, use the paddle board inflation video as a visual resource alongside your board’s own instructions. The written guidance remains your reference for pressure and valve details. Keeping both close at hand can make it easier to repeat the preparation steps next time.
If you’re exploring boards as well as improving your setup routine, browse the inflatable paddle board collections to see the available options. Each board has its own instructions, so make checking those details part of your preparation from the outset. Explore inflatable paddle boards and plan your next day on the water.
Set your next paddle session up for success
Make preparation part of the anticipation. Before your next outing, get familiar with your board’s instructions and make sure they’re easy to find. With practice, knowing how to inflate a paddle board correctly can become a calm, familiar start to time on the water rather than a last-minute puzzle.
That confidence begins before launch. Take your time, follow the guidance supplied with your board and give yourself room to prepare without rushing. Then you can turn your attention to the route ahead, the conditions on the water and the simple pleasure of getting out for a paddle.
Looking for a board for your next adventure? Explore inflatable paddle boards and find your next reason to head for the water.
Frequently Asked Questions
How much air should I put in an inflatable paddle board?
Inflate it to the pressure range specified for that particular board. For how to inflate a paddle board correctly, the board’s label or instructions are more useful than a target borrowed from another model. If the stated range gives you a lower and upper limit, aim within those limits rather than exceeding the maximum. Keep the guidance handy, especially if you use more than one board.
Can you overinflate an inflatable paddle board?
Yes. Exceeding the pressure specified for your board can put unnecessary strain on its material and seams, potentially causing damage. Don’t keep pumping just because the board seems as though it could feel firmer, and don’t use a higher target for a different board as a guide. If you’re unsure whether a reading is accurate, pause and check the pump instructions and board guidance before adding more air.
How do I know when my paddle board is inflated enough?
Use a pressure gauge and compare its reading with your board’s stated range. A firm surface alone doesn’t confirm that the board has reached the right pressure. If your pump doesn’t have a gauge, use a compatible pressure-reading method rather than relying on touch. Once you’ve stopped pumping, check the valve area for escaping air and make sure the board doesn’t soften unexpectedly before setting out.
How long does it take to inflate an inflatable paddle board?
Inflation time varies with the board, pump and how quickly you can operate the equipment. A manual pump may take longer and require more effort than an electric pump, but there isn’t one reliable time that applies to every setup. Allow extra time for laying out the board, checking the valve and reaching the stated pressure. The gauge reading, not the clock, tells you when inflation is complete.
Can I inflate a paddle board with a regular air pump?
Only if the pump is suitable for the board’s valve and can reach its required pressure. A general-purpose or low-pressure pump may move air into the board but still be unsuitable for completing inflation. Check the pump instructions and connector compatibility before use, and don’t force a fitting that won’t seat correctly. A pump intended for inflatable paddle boards is a more appropriate choice when it matches your board’s requirements.
What should I do if my paddle board loses air while inflating?
Pause pumping and locate where the air is escaping. If it’s coming from the hose connection, reseat the connector according to the pump instructions. If air escapes at the valve after you remove the hose, check the valve position and the board’s instructions. Don’t continue if the valve won’t hold air or the board keeps softening. Inflatable Boats offers repair services for punctures and valve issues. Resolve the problem before using the board.
Should the paddle board valve be open or closed when inflating?
Follow the valve instructions for your board. On a valve with a spring-loaded pin, the pin is commonly set in the up, closed position before attaching the pump, which helps prevent air escaping when the hose is removed. Valve designs can differ, so don’t assume every board works the same way. Check the pin position and connector instructions before pumping, then close and cap the valve as directed.