
How to Fit a Sounder to an Inflatable Boat Without Drilling
You don’t need to drill through an inflatable boat’s hull to fit a fish finder. A removable transom bracket or transducer mounting board can provide a secure mounting point without drilling into the hull. Knowing how to attach a sounder to an inflatable also means positioning the transducer just below the hull and clear of the motor.
It’s sensible to think carefully before putting a hole in a boat, and mounting equipment on an inflatable tube raises different questions. This guide covers no-drill mounting options, whether gluing a transducer to the tube is practical, and how to position and test the setup for a clear sonar image. It also explains how to route the display cable and secure the battery, so the sounder is ready for the water without compromising the boat’s layout.
Key Takeaways
- A fish finder can be fitted without drilling the hull; the right removable mounting approach depends on the transom and boat layout.
- Keep the transducer clear of propeller wash and turbulence, then assess the sonar image on the water before settling on its position.
- A separate mounting board can provide a practical alternative to fixing the transducer directly to an inflatable chamber.
- Gluing, a modified wheels bracket and portable or in-hull transducers each suit different setups, so consider how the boat will be used before choosing.
- Secure the sounder battery and cable independently, with enough cable slack near the motor to allow steering.
1. Can I mount a fish finder on an inflatable boat?
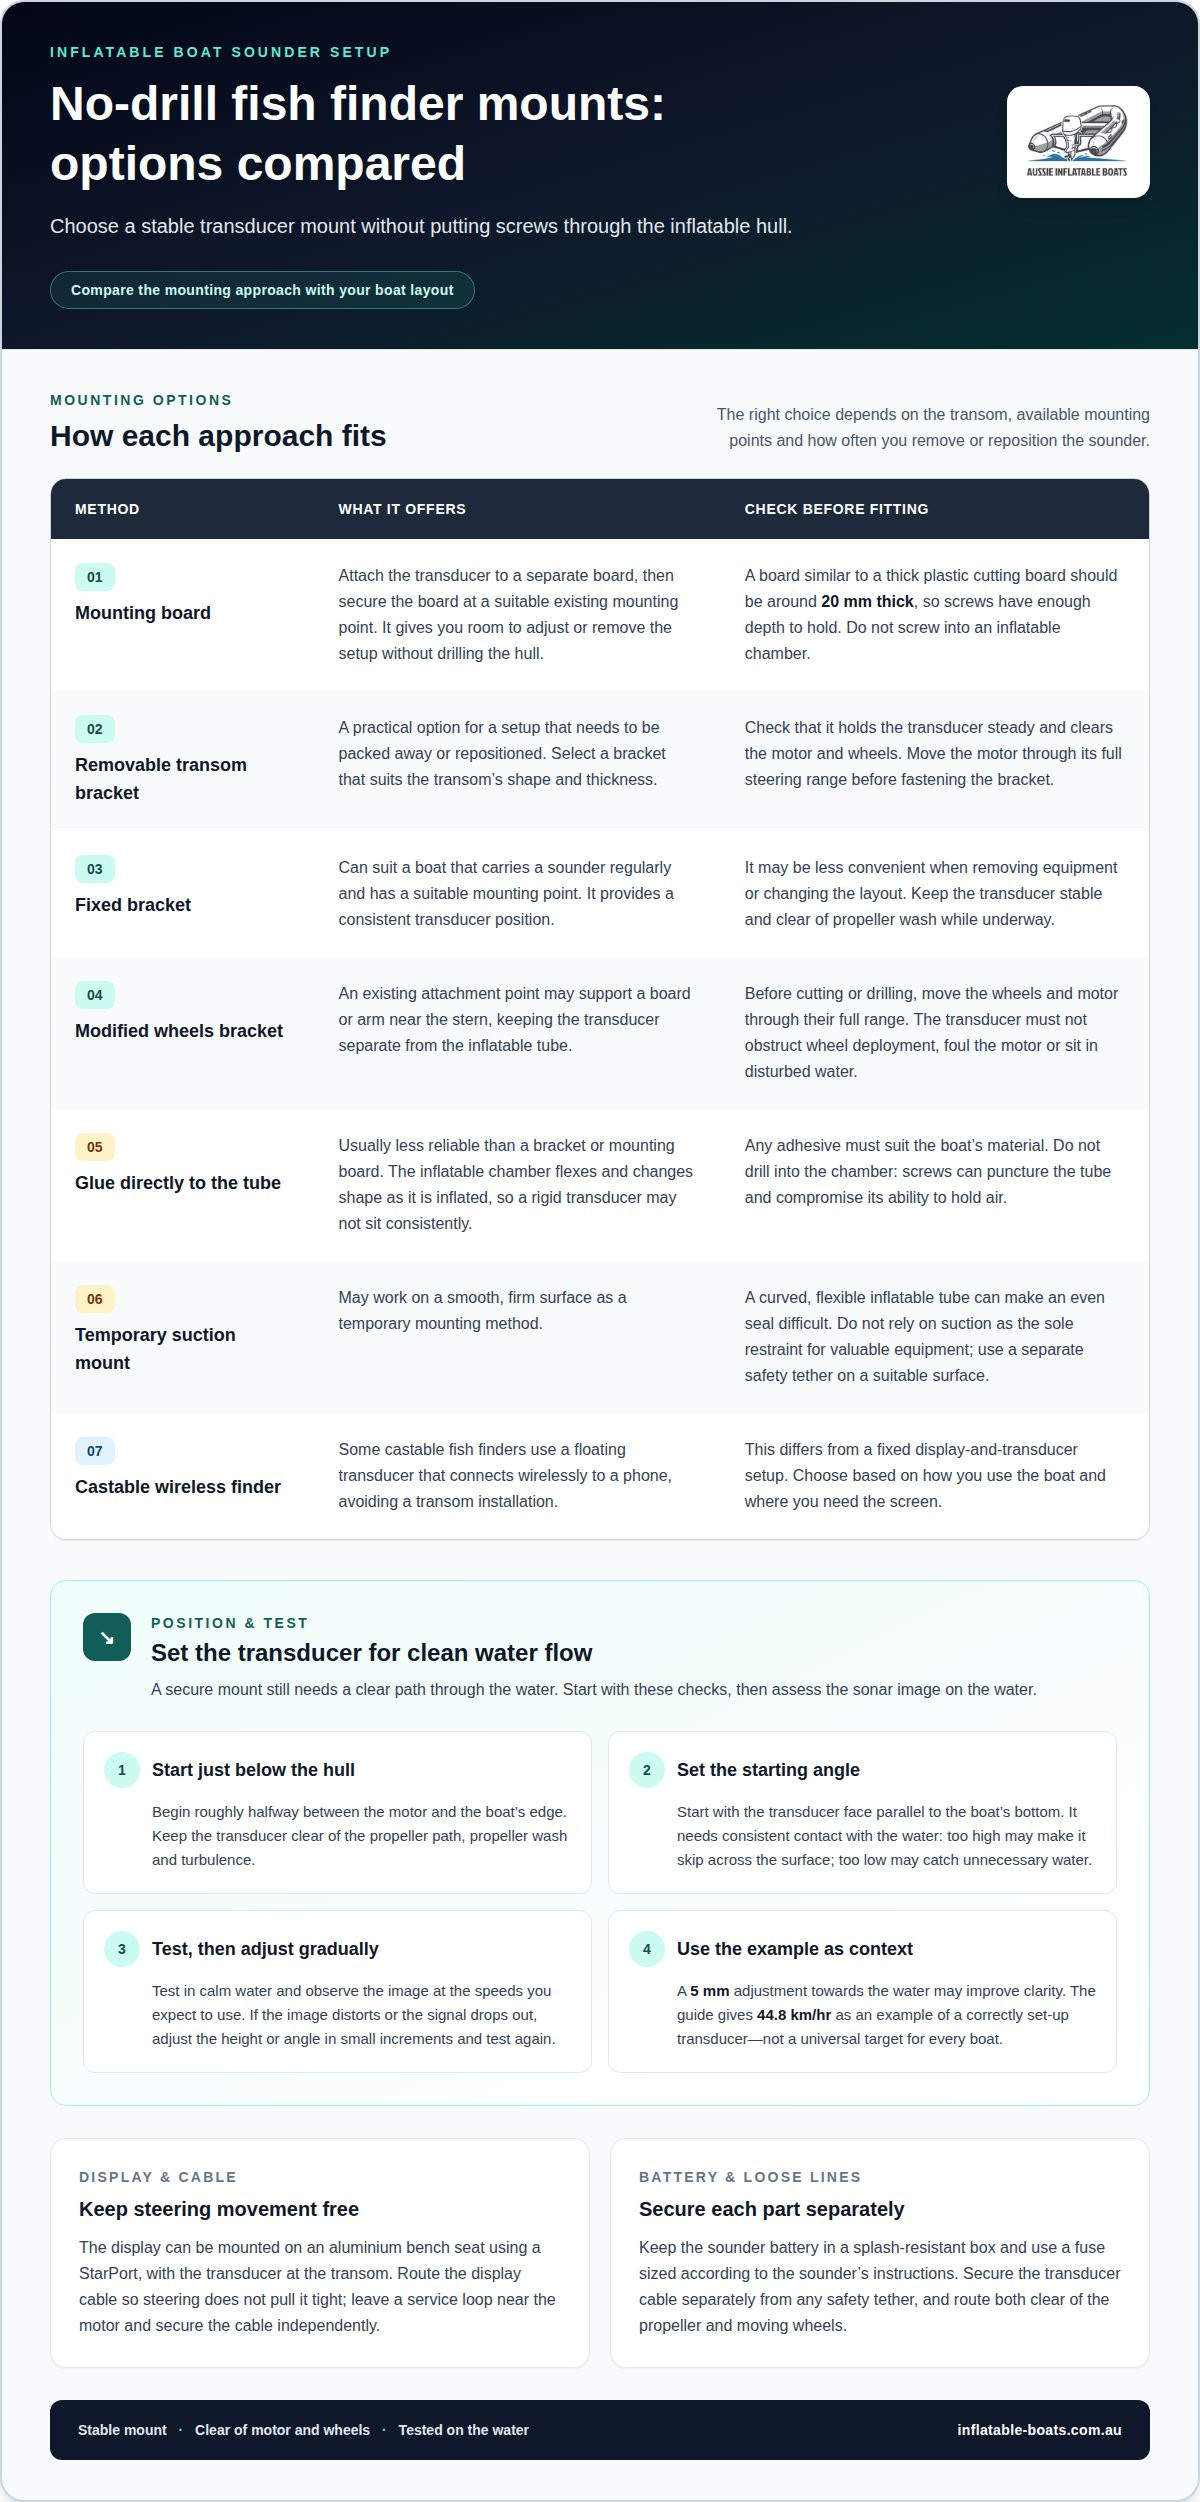
Yes. You can mount a fish finder on an inflatable boat without drilling into the hull. To attach a sounder securely, choose a stable transducer position, keep it clear of the motor, and preserve access to the boat’s wheels and transom.
A removable transom bracket is one option. Choose one that suits the transom’s shape and thickness, holds the transducer steady, and leaves clearance for the motor and wheels. Before fastening it, move the motor through its full steering range and check that the bracket and transducer don’t obstruct wheel movement. A bracket that fits when stationary can still foul equipment in motion.
Transducer position affects sonar readings. Start with the transducer just below the hull and roughly halfway between the motor and the boat’s edge. This can help keep it in contact with the water while reducing interference from propeller wash and turbulence. Keep it clear of the propeller’s path and away from water disturbed by fittings or the hull.
The transducer needs consistent contact with the water. If it lifts clear as the inflatable moves, the sounder can lose its signal or show a distorted image. Mounted too high, it may skip across the surface, particularly as speed increases. Mounted too low, it may catch unnecessary water or sit in a less clean flow. Start with its face parallel to the boat’s bottom, then make small adjustments to its angle or height.
A mounting board lets you avoid drilling into the hull. Attach the transducer to the board, then secure the board at a suitable mounting point. This gives you room to adjust the transducer without putting screws through the boat itself, and makes it easier to remove or reposition the setup. A removable transom bracket is another option if it fits securely and clears the motor and wheels.
A fixed bracket may suit a boat that carries a sounder regularly and has a suitable mounting point. It provides a consistent position but can be less convenient when you need to remove equipment or change the layout. A removable bracket suits setups that need to be packed away or repositioned. Either way, the transducer must stay stable and clear of propeller wash while underway.
Plan the display mounting separately. You can mount a fish finder display on an aluminium bench seat using a StarPort, while positioning the transducer at the transom. Route the display cable so steering movement won’t pull it tight. Leave a service loop near the motor and secure the cable independently, so it doesn’t drag or act as a tether.
Test the position in calm water, then observe the sonar image at the speeds you expect to use. If the image distorts or the signal drops out, adjust the transducer in small increments and test again. A 5 mm adjustment towards the water may improve sonar clarity. A guide example shows a correctly set-up transducer at 44.8 km/hr, but your own test should account for your boat and installation.
Secure the sounder battery in a splash-resistant box, and use a fuse sized according to the sounder’s instructions. Some castable fish finders use a floating transducer that connects wirelessly to a phone, avoiding a transom installation. This setup differs from one with a fixed display and transducer. Choose based on how you use the boat and where you need the screen.
2. Should I glue a transducer to the inflatable tube?
A mounting board or bracket usually supports a transducer more reliably than glue applied directly to an inflatable tube. The chamber flexes as the boat moves and changes shape with inflation, so a rigid transducer may not sit consistently against it. Any adhesive must also suit the boat’s material. A purpose-built mounting surface provides a firmer base without drilling into the chamber.
Do not drill a transducer into an inflatable chamber. Screws can puncture the tube and compromise its ability to hold air. Instead, a mounting board can be fixed to an appropriate existing mounting point, with the transducer attached to the board. A board made from material similar to a thick plastic cutting board should be around 20 mm thick, giving screws enough depth to hold securely.
A modified wheels bracket can provide another way to position the transducer near the stern. Its existing attachment point may support a board or arm, keeping the transducer separate from the inflatable tube. Before fitting anything, check how the bracket moves: the transducer must not obstruct wheel deployment, foul the motor, or be struck as the wheels move into position.
Plan any bracket modification around the boat’s layout before cutting or drilling. Hold the proposed board and transducer in position, then move the wheels and motor through their full range. Confirm that the transducer will sit in the water when the boat is afloat and stay clear of propeller wash and turbulence. A clear path through the water matters more than a convenient attachment point.
Temporary suction mounts can work on smooth, firm surfaces, but an inflatable tube is curved and flexible. This can make it difficult for a suction cup to maintain an even seal. Treat suction as a temporary mounting method, not the sole restraint for valuable equipment. If you use a suction mount on a suitable surface, attach a separate safety tether to a secure point.
A tether is a backup, not a substitute for a secure mount. Secure the transducer cable separately, too. It shouldn’t act as a tether, since strain can damage the connector or pull at the mount. Route it clear of the propeller and moving wheels. With a removable setup, keeping the cable and safety tether separate helps prevent loose lines from dragging equipment into moving parts.
A QuickLok mount and transducer arm can make removal and adjustment straightforward. The arm holds the transducer away from the boat’s side, while the mount provides a connection that can be released when packing up. Position the arm so it doesn’t interfere with the motor or wheels. Before launching, check that the locking connection is engaged and the transducer will stay in contact with the water.
A board is useful when an adhesive patch or tube-mounted bracket doesn’t provide a stable base. Screw the transducer to the board, then attach the board to a mounting point suited to the boat. This keeps the load off the inflatable chamber and makes future repositioning easier. Keep the board compact and clear of the tube’s movement, fittings, and access points.
Choose the mounting approach based on what the boat already provides: a suitable wheels bracket, a solid mounting point, or a surface suited to a temporary mount. Inflatable boat accessories can help complete a practical setup, while a mounting board gives the transducer its own secure base without drilling the chamber.
Test the transducer position in calm water and at the speeds at which the boat will be used. The Viper 400 Open Bow has a tube diameter of 50 cm.
4. Will an in-hull or portable transducer work on an inflatable boat
An in-hull transducer sends sonar through the material between its face and the water. This approach suits a solid hull with a suitable, continuous surface. An inflatable boat’s air-filled tube is different: air between the transducer and water interrupts the sound path. Fixing an in-hull unit inside a tube won’t make it perform like one installed against a solid hull.
Some inflatables have a rigid floor or transom, but those parts aren’t automatically suitable locations for an in-hull transducer. The transducer needs firm contact with the hull material and a clear path into the water. A flexible floor panel or air gap can disrupt that path. Before choosing an in-hull arrangement, identify the exact surface the transducer would face and whether it stays solid and stable.
A portable transducer is often a simpler fit for an inflatable. Some castable fish finders use a floating transducer that sends readings wirelessly to a phone. Place it in the water when fishing, then retrieve and stow it when moving or packing the boat. This avoids a permanent installation, though the phone still needs a secure, accessible viewing position.
You can also hold a portable transducer beside the boat with a removable arm or bracket. This keeps it outside the chamber and lets you adjust its position. Set it so the sensing face stays in contact with the water, clear of the motor, propeller wash, and moving fittings. If the mount shifts underway, readings may be interrupted.
Consider how you fish before choosing between a floating unit and an arm-mounted transducer. A castable model suits shorter sessions where quick setup and pack-down matter. A fixed display with a removable transducer arm may suit longer trips when you want readings visible without handling a phone. In either case, keep cables clear of steering movement and secure the battery in a splash-resistant box.
Portable doesn’t mean unsecured. A floating transducer needs a safe way to retrieve it, while an arm-mounted unit needs a stable attachment point. Keep the transducer cable separate from any load-bearing tether. Don’t rely on the cable to stop equipment drifting away. Stow loose lines and cables before moving the boat, especially near the motor and wheels.
To assess an in-hull option, work through the installation path before fitting anything:
- Identify whether the proposed surface is solid, rather than an air-filled chamber.
- Check whether the transducer face can sit directly against that surface.
- Look for gaps, flexible panels or fittings that could interrupt contact.
- Choose a portable external arrangement if the sound path cannot remain clear.
These checks help distinguish a genuine in-hull installation from simply placing a transducer inside the boat. If readings are weak or inconsistent, compare them with the transducer deployed in open water. This can show whether hull material, an air gap, or the transducer’s position is affecting performance. Test an external mount in calm water before relying on it on a fishing trip.
If you’re choosing a boat as well as a sounder setup, explore the inflatable boat range and consider where a portable transducer and display can sit securely.
Treat the first position as a trial rather than a finished setup. The guide recommends mounting a transducer just below the boat hull as a starting position. Test that position in calm water and at the speeds at which the boat will be used, rather than assuming it is suitable at every speed. The guide also recommends aligning the transducer parallel to the bottom of the boat before making small angle adjustments. Test the transducer on the water at different speeds; if the sonar image is distorted or the signal is lost, make small adjustments and test again. This lets you assess the reading as you refine the position.
For the Viper 400 Open Bow, the bare boat weight, without the Bimini and wheel kit, is ~56 kg. Its hull is made from 1.2 mm VALMEX® material. These specifications identify that particular boat, but do not by themselves establish that an in-hull installation has a continuous solid sound path or that a portable mount will remain stable. Check the actual transducer position and assess the sonar result under the intended operating conditions before relying on it.
Inflatable Boats
Inflatable Boats sells inflatable boats, accessories, and spare parts, and provides repairs for boat owners planning practical upgrades or maintaining their craft. If you’re choosing an inflatable or deciding which mounting approach suits its transom and layout, the right boat and compatible accessories can make the sounder setup easier to plan. If your existing boat is damaged around a proposed mounting area, repair support may be relevant before you add equipment.
Consider your intended transducer position, motor clearance and how you’ll secure the display and battery when selecting equipment. These details help shape a setup that fits the boat rather than forcing a mount into an unsuitable spot. For help with an inflatable boat, accessories, spare parts or repairs, contact Inflatable Boats.
Plan a sounder setup that suits your next outing
Before choosing equipment, consider how the sounder will fit into your usual time on the water. A setup for occasional fishing from a compact inflatable may call for different priorities from one used regularly with a display mounted aboard. Match the boat, mounting approach, and accessories to the way you plan to use them.
Your mounting decision can also help you identify what to maintain or replace. Inflatable Boats sells inflatable boats, accessories, and spare parts to support your setup as it takes shape. If you’re still weighing how to attach a sounder to an inflatable, contact Inflatable Boats with details about your boat and intended arrangement.
Contact Inflatable Boats for help with your boat and equipment choices, then get ready to make the most of your next fishing trip.
Frequently Asked Questions
Do I need to drill the transom?
No. You can use a removable bracket or a mounting board secured to a suitable existing point. Before choosing, inspect the transom for clearance around the motor, wheels, and fittings. Even without drilling, the setup must hold the transducer firmly and keep it clear of moving parts. Repair any damage from a previous fitting before mounting equipment nearby.
Can I mount a fish finder on an inflatable boat?
Yes. You can use a fish finder with an inflatable, either with an externally mounted transducer or a portable floating unit. The display can sit on a bench seat or another stable surface while the transducer sits in the water. For example, a phone-connected castable finder avoids installing a separate transom bracket, but you’ll need a secure, visible place for the phone.
How do you route the display, cable and battery?
Mount the display where it’s easy to read and won’t obstruct steering or movement around the boat. Route its cable clear of the motor, propeller, and wheels, leaving a service loop near the motor so steering won’t pull it taut. Secure the cable separately from the transducer. Store the battery in a secured splash-resistant box, and use a fuse sized according to the sounder’s instructions.
Should I glue a transducer to the inflatable tube?
Gluing directly to the tube isn’t usually the first choice for supporting a transducer. The chamber flexes, and the bond must suit both the boat material and the mounting load. A board or bracket provides a more solid attachment point without putting screws through the chamber. If you’re considering an adhesive-mounted base, check that the adhesive and surface preparation suit the tube material and intended use.
Where should a transducer go on an inflatable boat?
Position the transducer at the stern, where it can sit in clean water and remain clear of the motor and propeller wash. A useful starting point is just below the hull, roughly halfway between the motor and the boat’s edge. Avoid placing it behind a fitting or in disturbed water. Once afloat, check the sonar reading and make small position adjustments if needed.
How do you mount a fish finder transducer on an inflatable boat?
Attach the transducer to an external mounting point, such as a suitable transom bracket or board, rather than screwing into an inflatable chamber. Position it with its face parallel to the hull’s bottom, then check clearance around the motor and wheels before launching. In calm water, test the sonar at your usual speeds. Adjust the position if the image distorts or the signal drops out.
What are the best transducer mounts for inflatable boats: suction cup, clamp, or adhesive?
A bracket or board is a practical choice for a firm, adjustable installation. A clamp can work if the boat has a suitable solid edge, but it must stay clear of the motor and wheels. Suction cups need a smooth, compatible surface and a separate safety tether. Adhesive mounts depend on a suitable bond and careful surface preparation, making them less straightforward on a flexible, curved tube.
How do you attach a transducer to an inflatable PVC or Hypalon hull?
Don’t drill into an inflatable chamber, whether the hull is PVC or Hypalon. Instead, attach the transducer to a mounting board or bracket secured at a suitable existing mounting point. If you use an adhesive base, choose an adhesive and preparation method suited to the specific hull material. Secure the transducer cable separately, and avoid putting strain on the mount when turning or moving the boat.