
How to Check a Used iSUP for Leaks by Inspecting Key Areas
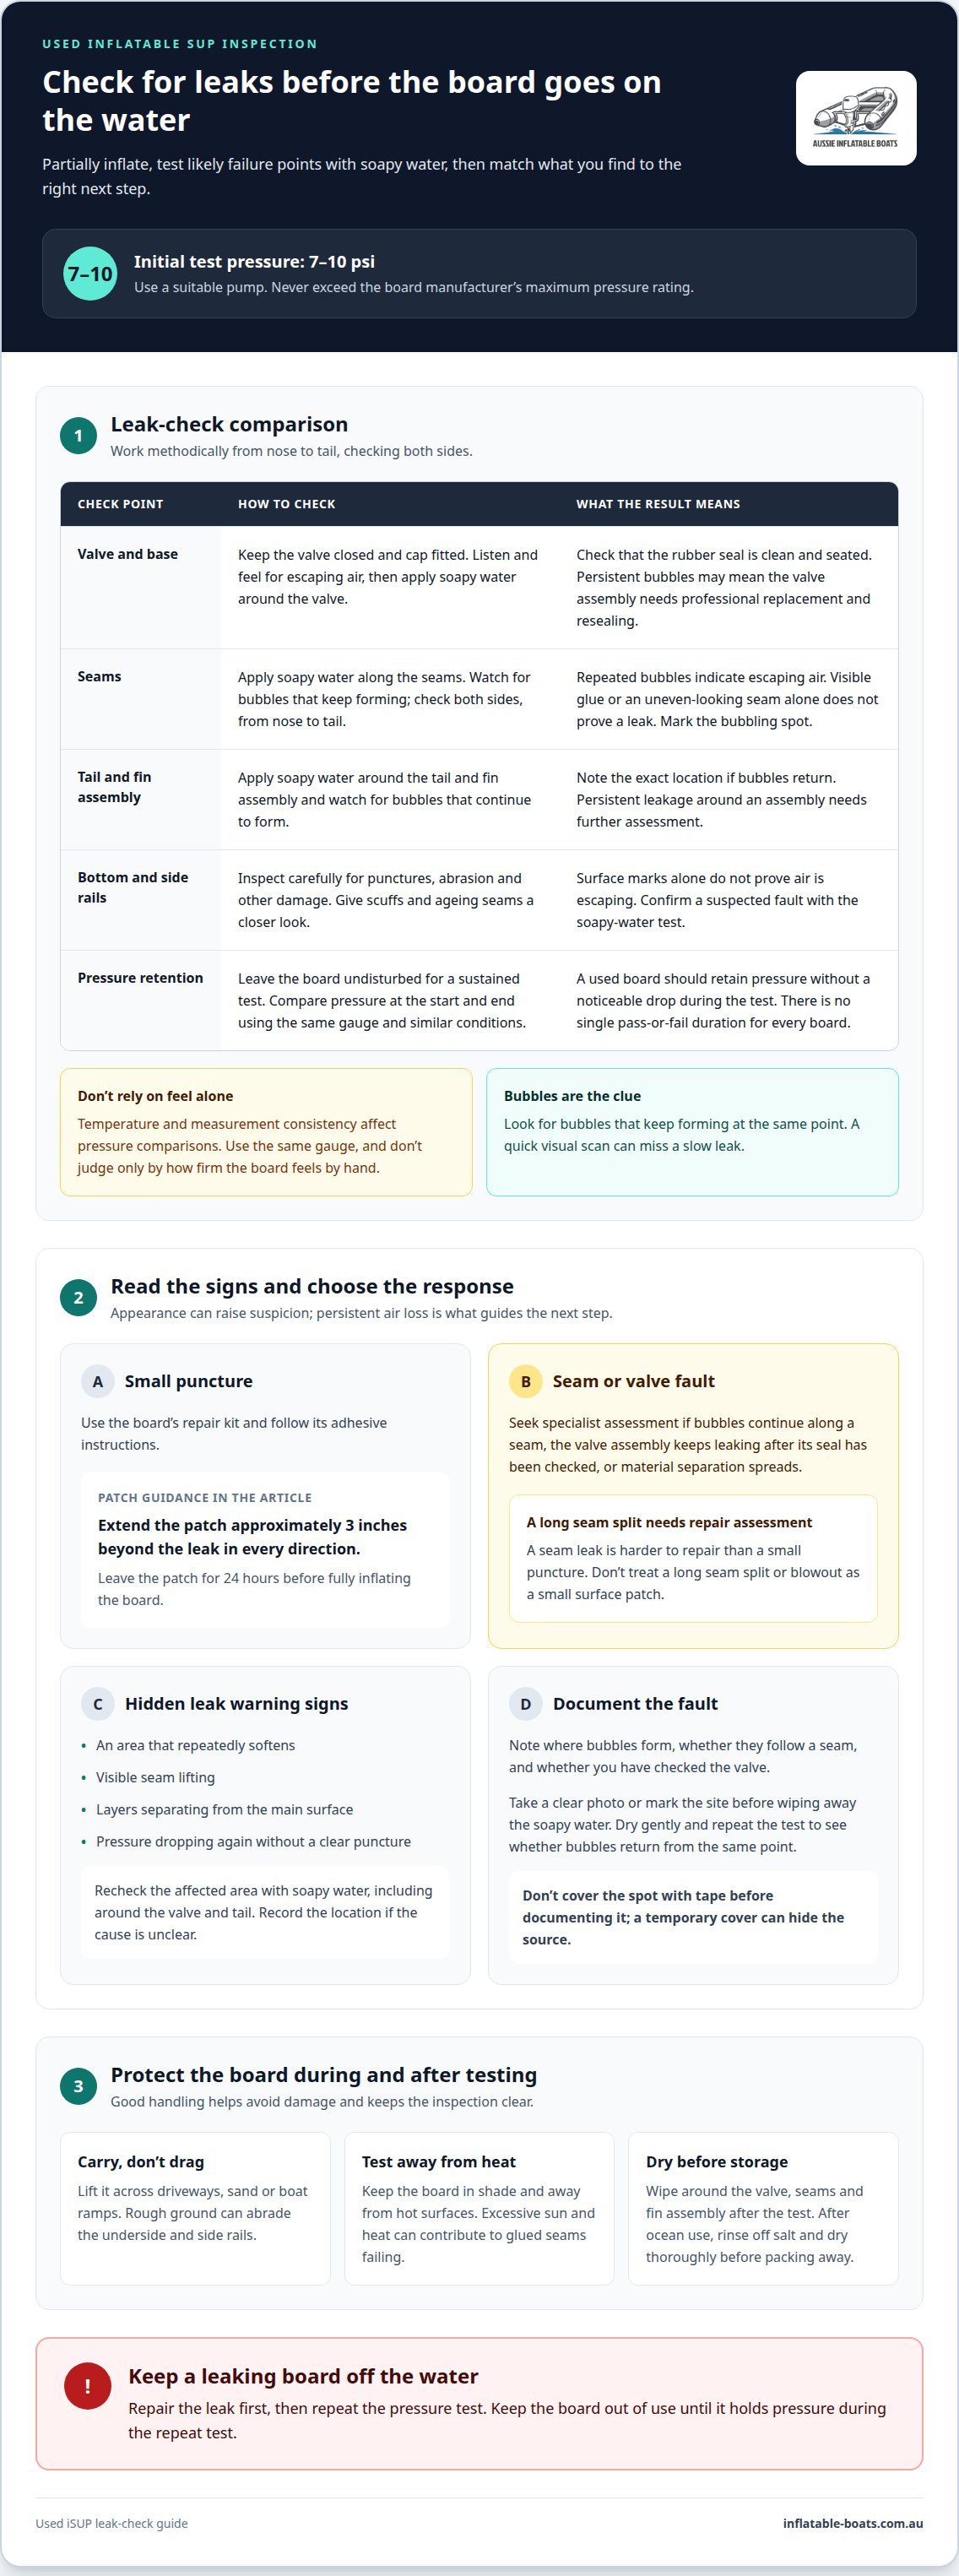
Knowing how to check for leaks on a used iSUP starts with a partial inflation to 7-10 psi, followed by a soapy-water test. Inspect the valve, seams, tail and fin assembly, bottom and side rails, watching for bubbles that keep forming.
A slow leak can be difficult to spot when an iSUP is deflated. Scuffs and ageing seams deserve a closer look, but surface marks alone don’t prove that air is escaping.
This guide explains how to check for leaks on a used iSUP, assess what you find and decide when a suspected fault needs specialist repair. Follow these steps before taking the board onto the water.
Key Takeaways
- Partially inflate the board to 7-10 psi before inspecting it, and never exceed its manufacturer’s maximum pressure rating.
- Spray soapy water around the valve, seams and fin assembly; bubbles can reveal escaping air.
- Give the underside and side rails a careful inspection for punctures, abrasion and other damage.
- Check the valve for looseness or grit before assuming the board needs a patch.
- Persistent bubbles at a seam or valve assembly can signal a repair that calls for specialist attention.
Partially inflating the board to check for leaks
Partially inflate the used board before inspecting it, then check for escaping air at likely failure points. This test also gives you a chance to assess the board’s condition before taking it onto an Australian waterway.
-
Partially inflate the board
Use a suitable pump and inflate the board to 7-10 psi for the initial leak check. Keep the valve closed and the cap fitted, then pause to listen and feel for escaping air around the valve and its base. Don’t exceed the manufacturer’s maximum pressure rating during testing. The usual operating pressure is 10 and 15 PSI, but follow the board’s own instructions for full inflation.
-
Inspect the seams for leaks
With the board partially inflated, apply soapy water along the seams and watch for bubbles that keep forming. Work methodically from nose to tail, checking both sides rather than focusing only on visible glue marks. Exposed adhesive alone doesn’t prove there’s a leak; escaping air produces bubbles at the fault. Mark any bubbling spot so you can find it again when deciding on a repair.
-
Assess air retention during the pressure test
Leave the board undisturbed for a sustained test, then compare its pressure with the starting reading using the same gauge. A used iSUP should retain pressure without a noticeable drop during that test. There’s no single pass-or-fail duration for every board; temperature and measurement consistency affect the comparison. Keep conditions similar, and don’t rely on how firm the board feels by hand alone.
- Carry the board rather than dragging it. Lift it across the driveway, sand or boat ramp, especially when moving it towards the water. Dragging can abrade the underside and side rails on rough ground, creating damage that may later leak. If you need to reposition the board, lift it and set it down clear of sharp edges.
- Keep the board out of strong sun and heat. Test it in shade, away from hot surfaces, then store it in a cool, shaded area. Excessive sun and heat can contribute to glued seams failing. Don’t leave a partially inflated board baking beside a vehicle while you inspect equipment or prepare for a paddle.
- Dry it thoroughly before storage. After the soapy-water test, wipe the board dry, including around the valve, seams and fin assembly. After paddling, rinse off salt following ocean use and dry the surfaces thoroughly before packing the board away. A dry board is less likely to develop mould in storage.
No. Don’t use a leaking inflatable SUP on Australian waterways. Find and repair the leak first, then repeat the pressure test before launching.
When to seek specialist leak detection
Get specialist help if a leak persists after basic checks or appears to involve a seam or valve assembly. Recording where bubbles form can help pinpoint the repair.
Test the valve by applying soapy water around it and watching for persistent bubbles. Check that the rubber seal is clean and seated. If bubbles remain, the valve assembly may need professional replacement and resealing.
If the O-ring is damaged, don’t guess at a replacement or force the valve apart. Have the seal matched and fitted as part of a proper valve repair.
-
Look for hidden leak warning signs
Inspect the inflated board for an area that repeatedly softens, visible seam lifting or layers separating from the main surface. These signs can point to a leak that a quick visual scan misses. Recheck the affected area with soapy water, including around the valve and tail. If pressure drops again and you can’t find a clear puncture, record the location and don’t paddle the board.
-
Recognise leaks needing specialist detection
Seek specialist leak detection if bubbles continue along a seam, the valve assembly keeps leaking after its seal has been checked, or visible separation spreads across the material. A long seam split, such as a blowout, needs repair assessment rather than a small surface patch. Describe the affected area and your test results. Inflatable Boats provides inflatable boat repairs to assess complex seam damage and the repair needed.
- Mark and clean the suspected leak site. Note its position on the board or take a clear photo before wiping away the soapy water. Dry the area gently, then repeat the test to see if bubbles return from the same point. Don’t cover the spot with tape before documenting it; a temporary cover can hide the source and complicate inspection.
- Separate board checks from business water-meter tests. To check a small or medium-sized business for a plumbing leak, record the meter reading, turn off water use, then take another reading after an hour or as long as possible. A moving meter indicates water use or a leak on the premises. This test won’t detect an iSUP leak; check the board’s valve, seams and surfaces instead.
- Choose repair over repeated testing when evidence persists. Record where bubbles form, whether they follow a seam and whether you’ve checked the valve. These details help a repair specialist distinguish a seal issue from a seam failure or puncture. Don’t keep fully inflating a board with spreading separation or recurring air loss. Arrange a targeted inspection.
Keep the board out of use until the leak is repaired and it holds pressure during a repeat test. For a difficult-to-locate leak, repair support for inflatable watercraft is a practical next step.
Identifying and handling seam leaks
For a small puncture, use the board’s repair kit and follow its adhesive instructions; make the patch extend approximately three inches beyond the leak in every direction. Leave the patch for 24 hours before fully inflating the board. A leaking seam is harder to repair, so have it assessed by a repair specialist.
- Confirm the seam is actively leaking. Apply soapy water along the suspect seam and watch for bubbles forming repeatedly at one point. A visible glue line or uneven-looking seam alone doesn’t confirm escaping air. For example, glue showing along about 1/8 inch of a five-year-old board was reported without a leak. Use bubbles, not appearance alone, to guide your next step.
- Mark the precise location. Note where persistent bubbles appear, such as the seam near the nose or a tail corner, before wiping the area. Mark beside the leak rather than covering it. This gives you a clear reference for another check or a repair assessment.
- Decide whether it’s a puncture or seam failure. A small, isolated leak on the top, sides or bottom may suit a repair-kit patch. Bubbles following a bonded seam point to a more complex fault. Don’t treat a long seam opening as a simple puncture; seam repairs can be difficult and need careful handling.
- Prepare a small puncture for patching. Deflate the board, then clean and dry the area around the leak before applying anything. Follow the repair-kit directions for the patch and adhesive. The patch should extend approximately three inches beyond the leak in every direction, covering sound material around the damage.
- Allow the repair to set before testing. Keep the patched area undisturbed for 24 hours before fully inflating the board. Use only the adhesive specified by the repair-kit instructions. Don’t launch the board while the patch is still setting.
- Send seam leaks for specialist repair. If bubbles persist along the seam or its edge is lifting, don’t peel it further or apply a small patch over the join. Bonded construction makes seam faults more demanding than isolated punctures. A repair specialist can assess the opening and determine the appropriate repair.
- Repeat the leak test after fixing. Once the patch has had 24 hours to set, partially inflate the board and apply soapy water around the repaired area. Watch for fresh bubbles, then check whether the patch edge remains sealed. If bubbles return at a seam, stop testing and arrange specialist assessment before using the board.
Checking the bottom, side rails, and deck
Inspect each surface systematically while the board is partially inflated. Pay particular attention to the bottom, which can meet underwater hazards such as rocks and branches.
- Turn the board over carefully. Place it on a clean, clear surface and support it along its length. Lift rather than drag it, so grit or rough ground doesn’t cause fresh abrasions during inspection. Start at the nose and scan the bottom in sections towards the tail. Check beneath the fin too, where contact with submerged obstacles can leave damage.
- Scan the bottom for punctures and abrasion. Look for cuts, pinholes, worn patches, deep scrapes or marks that expose another layer. Pay close attention to areas that may have contacted rocks or branches. A scuff alone doesn’t prove a leak: apply soapy water to a suspect mark and watch for bubbles that keep forming there.
- Trace both side rails from nose to tail. Examine the rails and their joins with the deck and bottom, looking for splits, lifted edges or localised deformation. Follow each join closely rather than jumping between obvious marks. Test a suspect area with soapy water; bubbles can help distinguish an active leak from surface wear.
- Check the deck and standing area. Inspect the top for sharp cuts, punctures and damage around attached components. Look closely where the deck meets the rails, then test suspect marks with soapy water. The traction pad can hide a small puncture beneath its edge, so inspect around its perimeter. Don’t peel back bonded material, as this can worsen the damage.
- Compare any mark with the surrounding surface. Check whether an indentation, raised patch or colour change has a visible puncture or produces bubbles. For example, a shallow scrape on the bottom without bubbles differs from a pinhole that repeatedly produces them. Note the exact location and take a photo so you can find the same spot during a second inspection.
- Test a suspect area without flooding the board. Apply a small amount of soapy water to one mark at a time, then watch for persistent bubbles. Wipe the surface before testing the next area, so leftover foam doesn’t obscure the result. If you find similar abrasion on both sides, check the corresponding area on the opposite rail too.
- Record damage before deciding what comes next. Note whether the mark is on the bottom, rail or deck, and whether bubbles appeared. Small leaks on these surfaces may be patched with the board’s repair kit. A leak along a rail join needs more careful assessment than an isolated puncture. Keep the board out of use until the damage is repaired and retested.
Tears and leaks
Trace escaping air before deciding whether a tear needs a patch or specialist attention. A controlled test can also help distinguish a faulty pump from a board leak. Knowing how to check for leaks on a used iSUP helps you identify the fault before choosing a repair.
- Check the inflation valve first. Apply soapy water around the valve and watch for bubbles that keep forming. A loose valve or grit against its rubber seal can cause air loss, so inspect the seal before patching the board. Keep the valve area clean and note exactly where bubbles appear.
- Snug a loose valve carefully. If the valve base has worked loose, gently turn it clockwise with the repair wrench supplied with the board. Don’t force the fitting. Check that the rubber seal is clean and seated, especially if grit may have caught against the O-ring.
- Repeat the valve test after adjustment. Apply soapy water around the valve again and watch the same area. If bubbles persist after tightening, the valve assembly may need professional replacement and resealing. Don’t keep tightening it or cover the valve with a patch.
- Rule out a faulty pump when inflation seems abnormal. If the board stops gaining pressure, try a different pump before concluding that the board is leaking. A pump problem can mimic air loss. Then apply soapy water to the valve, seams and visible damage to find escaping air from the board itself.
- Locate a tear with a focused bubble test. Partially inflate the board, then spray soapy water over a suspect cut, pinhole or abrasion. Escaping air creates bubbles at the leak. Test one area at a time, wiping away foam before moving on so bubbles from an earlier test don’t confuse the result.
- Match the repair to the damage. Small leaks on the top, bottom or sides can be patched with the board’s repair kit. A tear along a seam or a valve that continues to bubble needs more than a surface patch. If you’re unsure how to check for leaks on a used iSUP before repairing it, first identify the leak’s full extent.
- Retest after fixing a small puncture. Follow the repair-kit instructions and allow the patch to set before fully inflating the board. The repair guidance recommends waiting 24 hours after patching before full inflation. Then test around the patch edge with soapy water; fresh bubbles mean air is still escaping.
- Keep the board out of use while a leak remains. Don’t launch if bubbles persist, the valve continues leaking or the tear opens further under pressure. Record the location and visible damage. These details help distinguish a local puncture from a faulty valve or a more complex seam problem.
Inflatable Boats: Inflatable Boats
Inflatable Boats can help when your leak test points to damage that needs repair rather than another home patch. If bubbles persist along a seam, a valve keeps leaking, or a tear opens under pressure, Inflatable Boat Repairs are a practical next step. Share where the leak appears and what you observed during testing; those details help explain the fault clearly. For a minor puncture that seals properly with the board’s repair kit, a repeat pressure test may be all that’s needed before use. For persistent or complex damage, get in touch with Inflatable Boats to discuss the repair. Contact Inflatable Boats when you’re ready to talk through the next step.
Make the next outing a confident one
Treat the inspection as part of your buying decision, not a box to tick. Record suspect areas, pressure-test results and repairs, then keep those notes with the board. They’ll be useful for future checks and help you make a considered decision before your next paddle.
If learning how to check for leaks on a used iSUP has revealed damage you can’t repair properly, keep the board off the water and consider a repair. Inflatable Boats sells inflatable boats, accessories and spare parts, and provides repairs for inflatable watercraft. Choose the next step that suits the board’s condition, whether that means maintaining it, repairing it or considering a different craft.
Contact Inflatable Boats to discuss your inflatable watercraft needs. A careful inspection now can help you move towards your next adventure with greater confidence.
Frequently Asked Questions
I have a leak, how do I find it?
Start by checking the valve, seams and visible damage with soapy water. Work in small sections and watch for bubbles that keep appearing in one spot. If you can’t see a leak, note where the board seems to lose pressure and test those areas again. A faulty pump can also mimic air loss, so try a different pump before concluding that the board itself is leaking.
What about hidden leaks?
Look for recurring pressure loss even when no puncture is visible. Check around the valve base, fin assembly and bonded joins, then look for lifted material or layers separating. Hidden leaks may only become evident under pressure, so test the board while inflated rather than relying on its deflated appearance. If careful checks don’t pinpoint the suspected area, record the symptoms and have the board assessed before use.
What should I do if I have a water leak?
If you mean air escaping from the board, keep the iSUP out of use until the leak is fixed and retested. Mark the location, clean and dry the surrounding surface, then identify whether it’s a small puncture, valve fault or seam problem. Small surface leaks may suit the board’s repair kit. Persistent valve bubbles or a leaking seam need repair assessment rather than repeated patching.
How to test an iSUP valve for leaks and replace its O-ring
Partially inflate the iSUP, apply soapy water around the valve and watch for persistent bubbles. Check that the rubber seal is clean and seated. If the O-ring is damaged or bubbles remain, don’t force the valve apart or guess at a replacement; have a repair specialist match and fit the seal.