
How to Adjust Outboard Trim on an Inflatable for Take-Off and Efficiency
Trim is a handling control, not a finishing touch. Optimising outboard trim on an inflatable starts with a practical baseline: try the second trim-pin hole out from the transom, then adjust one hole at a time. Trimming in lowers the bow; trimming out raises it.
That small change can affect more than take-off. Too much trim in can make the hull plough through the water, while too much trim out can lift the bow excessively and cause unstable running or porpoising. Aim for a level, steady ride, light steering and an engine that runs cleanly.
You’ll learn what boat trim means, how to adjust a manual trim pin safely, and how to balance the motor angle with passengers, gear and changing water conditions. We’ll also cover what to watch on the water, from spray and engine sound to speed and steering response, so you can find a reliable setting for take-off and efficient cruising.
Key Takeaways
- Make trim changes gradually, then give the boat time to settle before judging the result.
- Adjust the motor angle for the water conditions: chop, swell and wind can change how the bow behaves.
- Balance passengers and gear to support steadier handling and an easier transition onto the plane.
- Use engine sound, spray, speed and steering response to help find a comfortable cruising setting.
- Before moving a manual trim pin, secure the boat and take the motor’s weight off the pin.
Adjusting trim for water conditions, wind and load
Wind, chop, swell, passengers and equipment can all change how an inflatable responds to trim. For reliable results, secure the boat before changing a manual pin, then assess each setting on the water.
- Secure the boat before moving a manual trim pin. Turn off the engine and secure the boat at a dock or on a trailer. Tilt the motor fully up and engage its tilt-lock lever to take the weight off the pin. Remove the retaining clip and pin, then choose another hole. Fully reinsert the pin and secure its clip before lowering the motor. Never move the pin while the engine is running or the boat is underway.
-
Make incremental adjustments for speed
Move the pin one hole at a time, then test the setting on the water. If you’re unfamiliar with the boat, let it settle after each change before judging speed, steering or engine response. This controlled approach makes the effect of each adjustment easier to identify. The aim isn’t simply to chase a higher speed reading.
Listen to the engine as you assess the result. A strained sound may indicate the motor is labouring; a sudden rise in revs can signal cavitation. Watch the boat’s attitude, too. Don’t continue trimming out if the bow lifts excessively or the hull starts bouncing. Once the trim and motor height suit the setup, they generally need no further adjustment during an outing. A changed load or choppier water may justify a one-notch change.
-
Adjust trim for efficient running
Match the trim to the water and load rather than relying on one setting for every outing. In chop, trim the outboard in to help keep the boat level and prevent the bow from flying high. In a prevailing chop or swell, trim out slightly if the bow is digging in. These adjustments address different problems, so observe the bow before changing the angle.
Wind, passenger numbers, gear and vessel type can all affect the boat’s attitude. The key to optimising outboard trim on an inflatable is to make a measured adjustment, then assess the result in the conditions you’re actually facing. After a load change, reassess how the boat sits instead of assuming the previous setting still suits.
When optimising outboard trim on an inflatable, watch the bow, steering and engine sound as the boat settles. A clean, steady run is a better guide than speed alone. Change the setting only when the boat’s behaviour gives you a reason, and avoid making several adjustments at once. This helps distinguish the effect of trim from changes in wind, water or load.
What is Boat Trim?
Boat trim is the outboard’s angle relative to the transom, which controls bow position: trim in lowers it, while trim out raises it. For take-off, start fully trimmed in; once on the plane, trim out gradually, with roughly a quarter of the trim range as a useful starting point.
There’s no single angle for every speed or load. Inflatable hull design, outboard size, transom height, passengers and gear all affect the result. Check the motor’s fit as well as its angle, because shaft length and transom height determine where the anti-ventilation plate sits.
-
Trim the outboard to get on plane
Start with the motor trimmed fully in, then accelerate smoothly and observe how the bow rises as the inflatable gathers speed. This setting helps reduce bow lift during the transition onto the plane. Avoid trimming out too early: lifting the bow further can prolong the transition and make the boat feel unsettled.
As the hull begins to plane, make a small trim-out adjustment and let the boat respond. The aim is to move from a bow-down take-off attitude towards a level running position. If the bow remains high or the boat starts bouncing, ease the trim back in rather than continuing to raise it.
-
Reduce drag as the boat planes
Trim out progressively once the boat is on the plane to reduce the amount of hull pushing through the water. A planing boat can start around a quarter of its trim range, then be fine-tuned for its particular setup. Watch for a clean ride and listen to the engine; a sudden rise in revs can signal propeller ventilation.
Keep adjustments modest on a smaller inflatable. Excessive trim-out can lift the bow too far, reduce stability and cause rhythmic bouncing called porpoising. If that starts, trim in until the hull settles. A boat that remains trimmed down after planing may plough through the water, adding drag instead of reducing it.
-
Set trim for cruising
Trim out gradually during a steady cruise until steering feels lighter and the hull runs cleanly. The best setting holds a level, stable attitude without porpoising or ventilation, not necessarily the position that produces the highest speed. Engine sound, spray and steering response help show when no further adjustment is needed.
Account for the combination, not just the motor. Short-shaft outboards measure approximately 15 inches from the transom seating point to the cavitation plate; long-shaft models measure approximately 20 inches. For many inflatable combinations, the anti-ventilation plate can sit level with or up to 25 mm below the transom keel line. Compare inflatable boat options with your intended outboard setup in mind.
Balancing weight for stability and take-off
Passenger positions, fuel and gear affect an inflatable’s balance before you adjust the outboard angle. Reorganise the load first, then assess how the boat accelerates, steers and rides.
-
Place heavy items low and distribute them along the boat. Keep the fuel tank amidships, where its weight is less concentrated at either end. Avoid piling equipment beside the transom: extra stern weight can make the bow rise and delay the transition onto the plane.
For example, move a portable load from the stern towards the middle, then see whether the hull sits more evenly. Secure items so they don’t shift as the boat accelerates or crosses chop. A changing load can alter stability and make a trim setting feel different.
-
Balance passengers before changing the outboard setting. If two people are aboard, avoid placing both at the stern while leaving the bow empty. Spread their weight so the inflatable sits more evenly fore and aft. This can help the boat accelerate without excessive bow rise.
Passenger position also affects steering. If the boat leans or feels difficult to control, redistribute people and gear before making another trim adjustment. Compare the boat’s response after each change instead of moving several loads at once.
-
When boating solo, sit as far forward as comfortable. This helps counter the weight concentrated at the transom by the driver and outboard. If the boat still struggles to rise onto the plane, place some additional weight forward while keeping the load secure.
Don’t overload the bow. Too much forward weight can make steering harder, limit speed potential and send spray over the bow. If these signs appear, move some gear towards the centre and reassess the boat’s attitude.
-
Remove gear you don’t need for the outing. Unnecessary equipment adds weight without helping the boat accelerate or remain balanced. A lighter, sensibly organised load improves the power-to-weight ratio, while distributing the remaining passengers and gear supports stable handling.
Before departure, group equipment according to where it can be carried securely. Keep essential items accessible, but avoid stacking everything forward or aft. The goal is an even load, not simply moving all available weight towards one end.
-
Reassess trim after changing the load. A heavier load at the stern may call for slightly more trim out, while a lighter load may need less. Make a small adjustment, then observe the bow, acceleration and propeller grip rather than assuming the previous setting still suits.
If the inflatable struggles to plane or develops excessive bow rise, review passenger and gear placement before trimming further. Too much stern weight can contribute to porpoising; shifting weight towards the centre may address the cause more directly. Change one factor at a time to identify which adjustment improves stability.
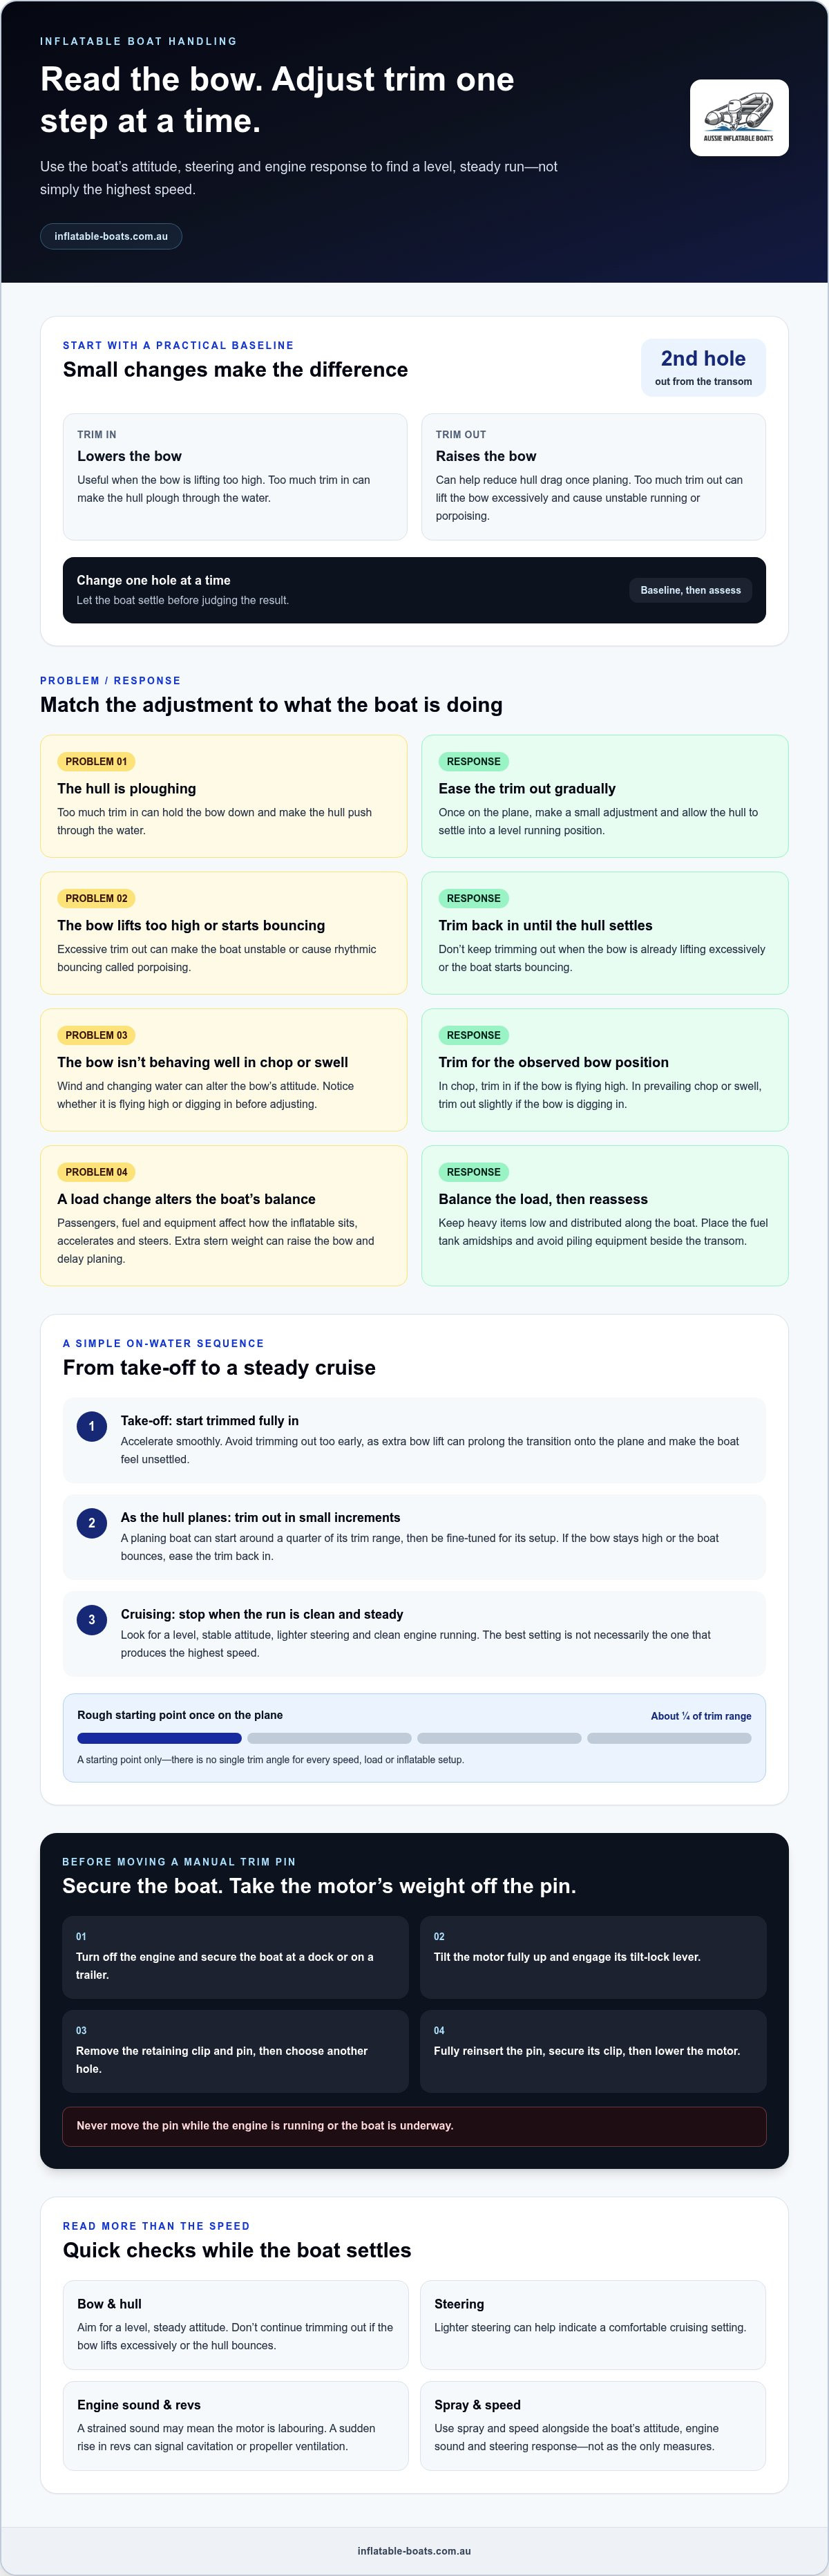
How trim angle affects boat handling and efficiency
- Use trim-in for tight turns. Before turning, bring the outboard in to help the propeller maintain grip. This supports predictable handling as the inflatable changes direction. If the propeller loses grip, steering can feel less consistent, so avoid carrying excessive trim-out into a tight turn. Once the boat straightens, trim out gradually during acceleration to regain speed without an abrupt change in attitude.
- Trim for a level cruising attitude. On a straight course, raise the motor gradually until the hull runs level and steering feels light and responsive. This neutral cruising position helps the engine operate efficiently instead of forcing the bow high or pushing it down. Judge the result by how the boat tracks and responds, not by speed alone. A clean, steady ride is the practical target.
- Correct a bow that ploughs through the water. If the inflatable feels sluggish, steering becomes heavy or spray crosses the bow, trim out slightly. An outboard left too far in after the boat planes can hold the bow down and increase hull drag. Make one small change, then observe the hull’s attitude and steering response before adjusting again. The aim is to reduce resistance without lifting the bow excessively.
- Respond to porpoising by trimming in. Rhythmic bouncing after trimming out indicates the bow is lifting too far for that setup. Bring the outboard in until the hull settles and runs more steadily. Excessive trim-out can reduce stability, particularly on a smaller inflatable, and may contribute to propeller ventilation. Don’t keep raising the motor to chase speed when the boat’s handling is already deteriorating.
- Match trim to the manoeuvre. As the boat comes off the plane, trim in to give the propeller better grip for low-speed manoeuvring. In rough water, adjust the bow attitude to suit the conditions rather than holding one setting throughout the trip. Correct trim can improve control in turns and rough water, reduce drag, and help limit wear on the engine and propeller. Reassess whenever handling changes.
How do you set outboard trim on an inflatable boat for best performance?
- Begin with a practical pin position. For a manual-trim outboard, try the second trim-pin hole out from the transom as a starting point. This is a baseline, not a universal setting: inflatable hulls, motors and loads behave differently. If your boat already runs level and steers cleanly, note its current setting before making changes so you can return to it if needed.
- Change the pin only while the boat is secure. Turn off the engine and secure the boat at a dock or on its trailer. Tilt the motor fully up and engage the tilt-lock lever to take its weight off the pin. Remove the retaining clip and pin, move the pin to another hole, then fully reinsert and clip it before lowering the motor. Never adjust the pin underway.
- Test the setting on the water. Begin with the outboard trimmed in for take-off, then observe the boat as it accelerates. Once it reaches the plane, trim out in small increments. Let the hull settle after each change. Check speed, engine sound, spray pattern and manoeuvrability together; a speed increase alone doesn’t prove the setting is right.
- Read the boat’s response before adjusting again. If the bow ploughs through the water, trim out slightly and assess whether the hull runs cleaner. If the bow rises too far, steering becomes unsettled or the boat starts porpoising, trim back in. On a smaller utility inflatable with manual pin adjustment, choose a suitable setting and generally leave it there during the outing.
-
Account for the setup and conditions. The right outboard angle depends on the hull and setup, so assess the boat’s attitude underway and adjust cautiously. A planing boat may run well with trim around halfway through its range, depending on its setup. Trim up for shallow-water manoeuvring, then reassess the setting when returning to deeper water.
For a more suitable hull-and-motor combination, explore inflatable boat options for your intended use.
Inflatable Boats: Inflatable Boats
Inflatable Boats can help you match your boat and supporting equipment to the way you use it. If your inflatable’s handling changes despite sensible trim and balanced loading, a suitable boat, accessory or spare part may be the next practical consideration. Inflatable Boats offers inflatable boats, accessories, spare parts and repairs to support owners choosing equipment or addressing wear and damage that can affect their time on the water.
For example, a repair may be relevant when damage affects the hull or transom area, while an accessory or spare part may suit an equipment replacement. Explore Inflatable Boats online, or contact Inflatable Boats to discuss your boat and boating needs.
Make your next outing a useful test
Turn each trip into a chance to learn how your own boat responds. Keep a simple note of the load, water conditions and trim position, then record how the inflatable accelerates, steers and feels underway. These observations can help you recognise a useful setting for a familiar setup, rather than relying on memory or changing several things at once.
Optimising outboard trim on an inflatable is an ongoing process of matching the boat to the conditions. A passenger change, different gear or a shift in the water can alter how it handles. Use your notes as a practical starting point, then make measured adjustments and pay attention to the boat’s response.
If you’re choosing an inflatable or considering suitable equipment for your setup, contact Inflatable Boats for advice. Take your observations into your next outing, make each change deliberately and enjoy building a better feel for your boat.
Frequently Asked Questions
Why is Trim Angle So Important?
Trim angle changes how the hull meets the water, affecting drag, steering and ride attitude. A setting that suits a light solo outing may feel different with passengers aboard or gear stored aft. For example, if the bow feels heavy and spray crosses it, the motor angle may be adding resistance. Assess the hull’s response alongside engine sound rather than treating trim as a speed setting alone.
How can you tell if an inflatable's outboard is trimmed too far in or out?
Too much trim in can make the bow push through the water, with heavier steering and more spray over the bow. Too much trim out may lift the bow excessively, cause rhythmic bouncing or make the propeller lose grip. Note when each symptom begins: if bouncing starts after trimming out, bring the motor in gradually. A sudden rise in engine revs can also signal ventilation, so ease the trim back.
How does passenger and gear weight distribution affect trim on an inflatable boat?
Weight changes the boat’s fore-and-aft attitude, so the same motor setting can behave differently after passengers or equipment move. If the stern sits low, shift suitable gear towards the centre and spread passengers more evenly before changing trim. When boating solo, sitting comfortably forward can help counter the driver and outboard’s aft weight. Avoid overloading the bow, which can make steering difficult and bring spray aboard.
What are the steps for safely adjusting outboard trim while underway?
Use the power-trim controls for small changes while moving, maintaining a steady course and letting the boat respond before adjusting again. Don’t attempt to move a manual trim pin underway. To make that adjustment, stop the engine and secure the boat at a dock or on a trailer; tilt the motor fully up and engage the tilt-lock lever before removing the pin. Refit its retaining clip before lowering the motor.
How does correct outboard trim affect fuel consumption, speed and handling?
Correct trim reduces unnecessary hull drag, helping the boat maintain speed with less throttle and supporting efficient engine operation. It also affects steering feel: a level hull generally feels lighter and more responsive than one ploughing bow-down or lifting excessively. Compare settings under similar load and water conditions, watching speed, engine sound and steering together. Trim can improve efficiency, but no setting suits every inflatable and outing.
What are the risks of incorrect trim, including porpoising, ventilation and loss of control?
Excessive trim-out can lift the bow and trigger porpoising, the repeated rise and fall of the hull. Ventilation occurs when the propeller loses its clean grip in the water; engine revs may rise suddenly while thrust falls. Either condition can make steering and speed less predictable. If the boat bounces or grip drops, trim in gradually and ease the throttle if needed until the hull runs flatter.
How should you trim an inflatable in rough water or when carrying passengers?
In chop, trim in if the bow is lifting too high; in a prevailing swell, trim out slightly if the bow is digging in. With passengers aboard, distribute people and gear so weight isn’t concentrated at the stern or bow, then reassess the boat’s attitude. Make one small adjustment at a time and let the hull settle. If conditions change, respond to the boat’s handling rather than holding one setting rigidly.